
5 Best Disk Partition Manager Software for Mac 2025

Last updated on May 20th, 2025 at 9:35 am
Mac users often need to split their hard drives into parts. This splitting is called partitioning. You might want to try a new Mac OS, keep your data safe, or make your Mac run faster. For these tasks, you need the best disk partition manager software for Mac. Without good tools, changing your disk layout can be risky.
Good disk partition tool helps you control your storage space on Mac. It lets you create, delete, resize, and format partitions. In 2025, we have many choices for disk partition programs for Mac. This article looks at the top five disk partition tools. We’ll show you what makes them the best disk partition manager software for Mac. We’ll also help you pick the right one for your needs. From free built-in options to pro-level paid tools, we cover the full range.
Part 1: What Is A Disk Partition Software?

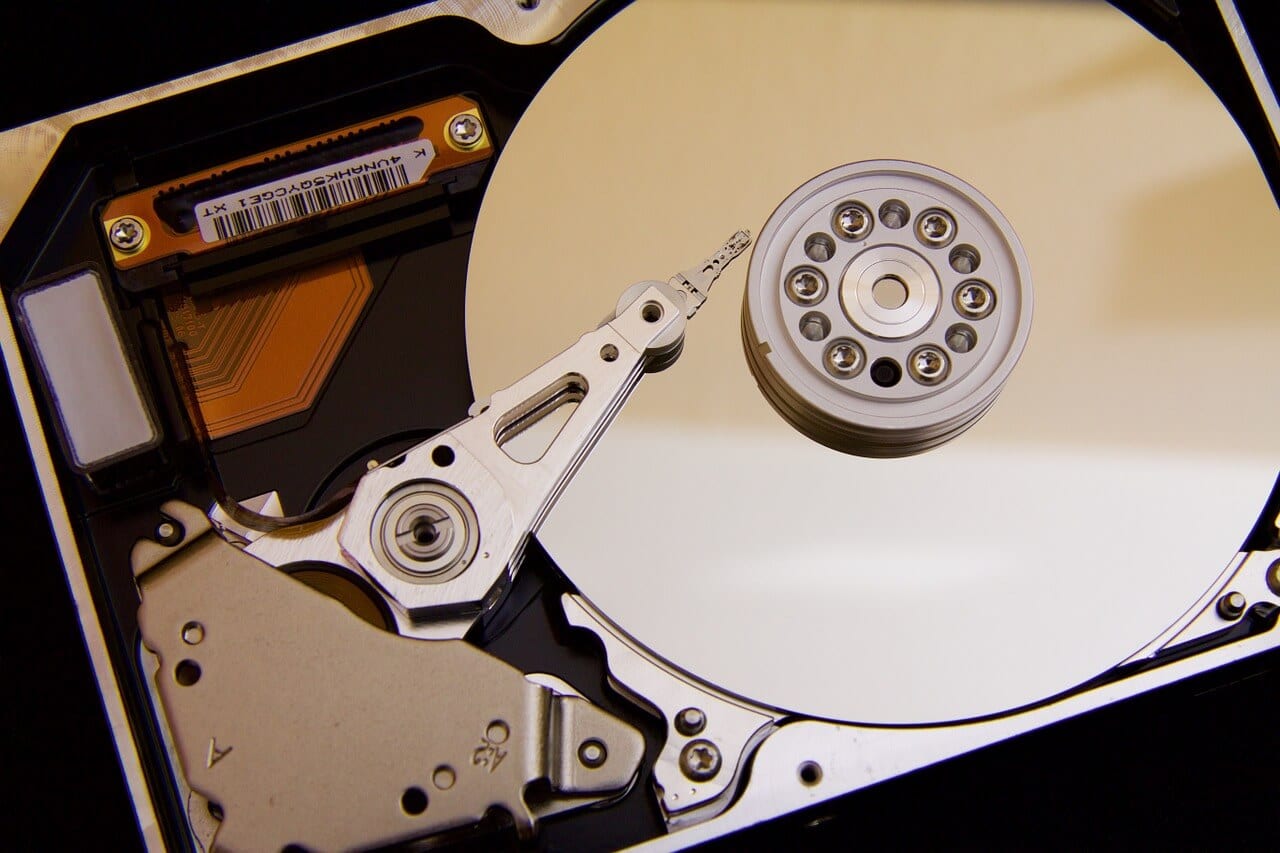
Disk partition software splits your hard drive into parts. Each part acts like a separate drive. This software helps you organize your storage space better. It’s a tool that gives you more control over your Mac’s hard drive. Think of it like turning one large room into several smaller rooms with walls between them.
With disk partition management software for Mac, you can create new partitions. You can also resize existing ones or delete them. It keeps your files safe during changes. Good software has safety checks before making changes. It also has recovery options if something goes wrong.
Part 2: Why Do You Need a Disk Partition Tool on Mac?
A disk partition tool for Mac helps you manage your storage space better. Here’s why you might need one:
- Install multiple operating systems: You can run macOS alongside Windows or Linux on the same Mac. This setup is great for testing software across platforms. Gamers often use this to play Windows games on their Mac.
- Organize files better: Organize your files efficiently by using separate partitions for work and personal data. This makes finding things easier. It also helps when backing up only certain types of files.
- Back up data easily: Create a partition just for Time Machine or other backup tools. This keeps your backups safely separated from daily work. It helps prevent backup file corruption.
- Improve performance: Separate system files from user files to reduce fragmentation. Your Mac can run faster when the system doesn’t need to search through user files. This is helpful for older Macs.
- Test new macOS versions: Try new OS versions without affecting your main system. If you don’t like the new version, you can simply remove that partition. This is safer than upgrading your main system.
Part 3: Advantages And Disadvantages Of Using A Disk Partition Tool
Advantages:
- Better file organization by keeping different types of data separate
- Easier backup management with dedicated backup partitions
- Improved system performance by reducing drive fragmentation
- Protection against data loss if one partition fails
- More control over your storage space usage
- Easier troubleshooting when system problems occur
- Option to encrypt specific partitions for better security
Disadvantages:
- Risk of data loss if partitioning goes wrong
- Less flexible storage space as each partition has a fixed size
- More complex setup that might confuse new users
- Some partition changes require system restart
Part 4: Precautions To Take When Using Disk Partition Manager Mac
Before using a disk partition software for Mac, take these important safety steps:
- Back up all data: Always make a complete backup before changing partitions. Use a reliable backup tool like Time Machine. Save the backup on a separate drive and check that it works properly.
- Use stable power: Don’t partition during storms or when your battery is low. A power outage during partitioning can damage your drive. Keep laptops charged and use a UPS for desktop Macs if you can.
- Close all running programs: No apps should be using the drive you’re changing. Even background processes can cause problems. Restart your Mac and only open the partition tool before making changes.
- Verify drive health: Check for errors before partitioning with Disk Utility. Run First Aid to find and fix problems. Don’t partition drives with bad sectors or other hardware issues.
- Read instructions carefully: Understand each step before you take it. Look up terms you don’t understand. Follow the software’s recommendations for your specific drive type.
Part 5: Top 5 Disk Partition Software For Mac
1. Disk Utility (Built-in)
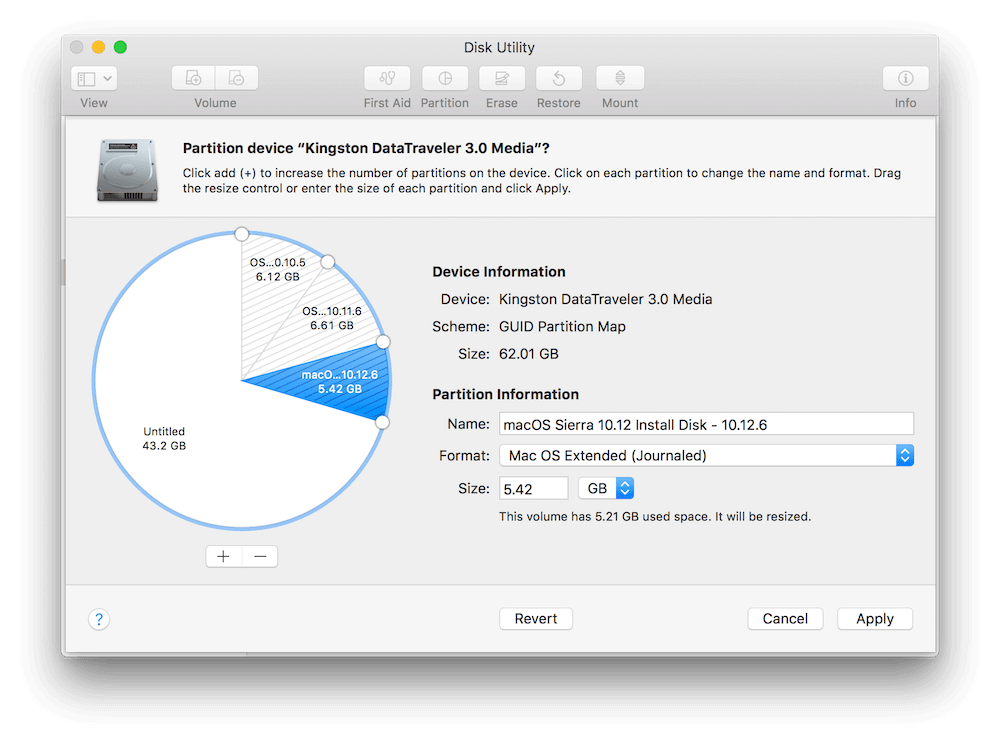
Disk Utility comes free with every Mac. It handles basic partition tasks well. Apple keeps it updated with each macOS version. And the best part? You don’t need to download any tool to use it.
This built-in tool works with all Mac file systems. It has a clean, simple interface. While not as full-featured as paid options, it’s still powerful. Many Mac users never need anything beyond Disk Utility. It’s particularly good for APFS operations since Apple designed both the file system and the tool.
Key Features:
- Create, delete, and resize partitions with a simple interface
- Support for APFS, HFS+, and other formats including FAT and exFAT
- Secure erase options for privacy when selling or giving away drives
- Create disk images for backup or transfer between Macs
- Mount and unmount volumes easily with one click
- Free with macOS and always compatible with your system
- Regular updates through system updates to support new drive types
2. DiskMaker X
DiskMaker X focuses on creating bootable drives. It’s great for making recovery drives or OS installers. The software is lightweight but powerful for its specific purpose. It’s especially useful for IT professionals who manage multiple Macs.
This tool stands out for its simple workflow. It walks you through each step clearly. While not a full partition manager, it’s excellent for boot drives. Many tech support pros keep this tool handy. It can create bootable drives from any macOS installer you have downloaded.
Key Features:
- Create bootable macOS installer drives in minutes not hours
- Simple, guided interface with clear instructions for each step
- Fast operation even on older Macs with limited resources
- Support for multiple macOS versions going back several releases
- Customization options for boot drives including partition size
- Small download size makes it easy to keep on a USB thumb drive
3. iBoysoft DiskGeeker
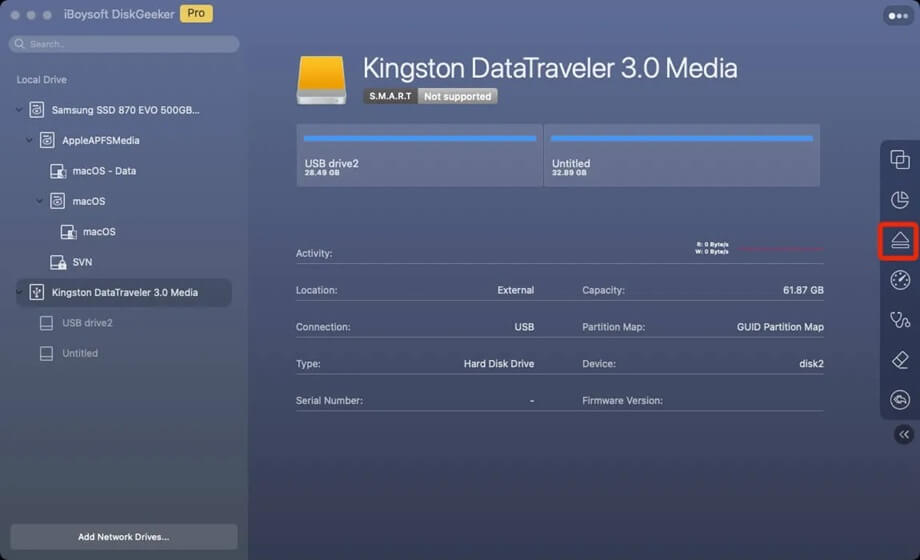
iBoysoft DiskGeeker is a full-featured partition manager. It handles advanced tasks that Disk Utility can’t. The software has a modern interface that’s still easy to use. It combines partition management with several other disk tools.
This tool excels at working with external drives too. It supports many file systems beyond Apple’s defaults. While it costs money, it offers good value. Many pros choose it for its reliability. It can handle complex partition schemes that might confuse other tools.
Key Features:
- Advanced partition management including split, merge, and resize
- Support for NTFS, exFAT, ext4, and more file systems
- Data recovery tools built in to rescue deleted files
- Disk health monitoring to catch problems early
- Secure erase functions with multiple passes for complete privacy
- Clone drives or partitions for easy backup or upgrade
4. Paragon Hard Disk Manager
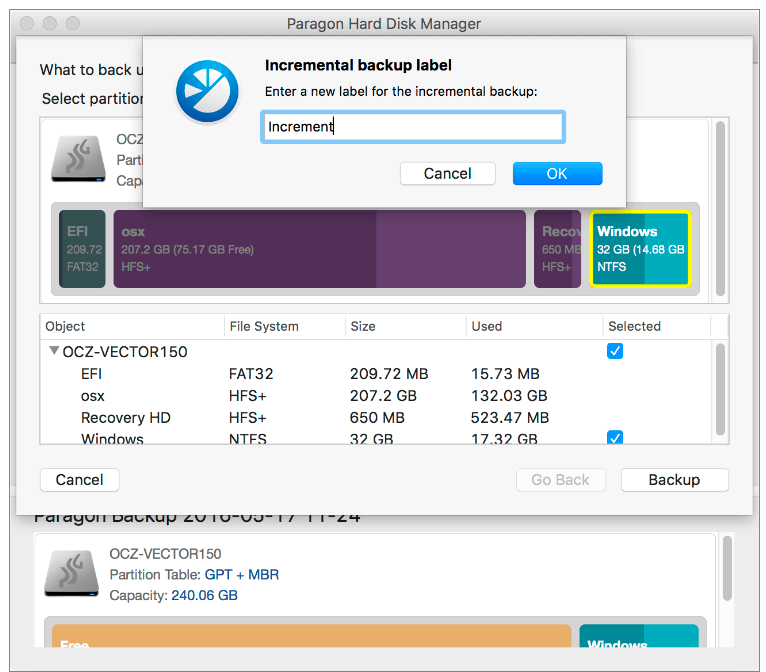
Paragon Hard Disk Manager is powerful yet user-friendly. It focuses on safety while offering pro-level features. The software has been around for years and has a good track record. It’s regularly updated to support new Mac hardware.
This tool shines when working with both Mac and Windows drives. It handles complex partition schemes well. Its backup features are also top-notch. Many businesses trust Paragon for their Macs. It’s especially good for Macs that need to work with PC drives often.
Key Features:
- Complete partition management suite with advanced options
- Excellent Windows/Mac compatibility for mixed environments
- Backup and restore functions with scheduling
- Virtual disk support for mounting disk images
- Boot correction tools to fix startup problems
- Partition conversion without data loss between formats
- Split and merge partitions while preserving data
- Disk wiping tools that meet security standards
5. iPartition
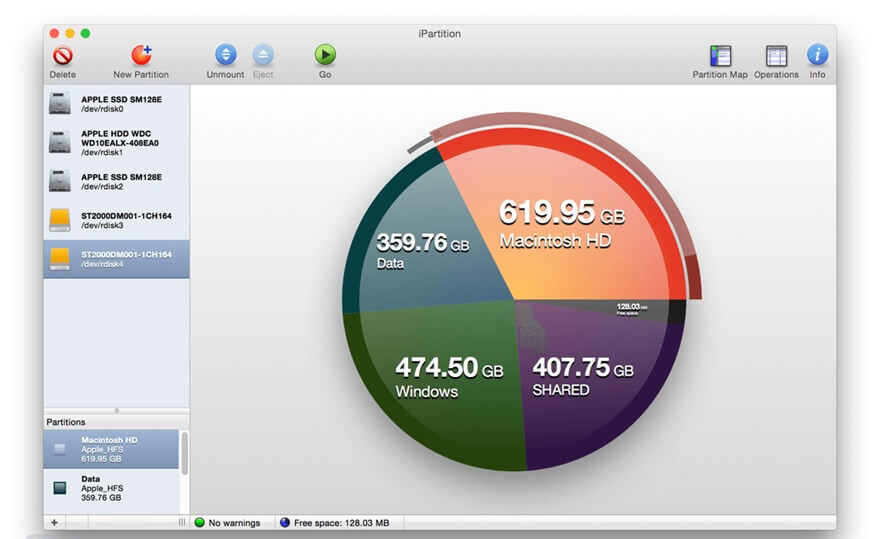
iPartition makes disk management simple for average users. It has a drag-and-drop interface that feels natural. The software prevents common mistakes with built-in safeguards. It shows you exactly what will happen before you confirm changes.
This tool is great for visual thinkers. It shows your disk layout graphically. While not as feature-packed as some options, it’s very approachable. Many home users prefer it for occasional needs. It’s particularly good for users who find Disk Utility confusing.
Key Features:
- Visual partition editor with color-coded display
- Drag to resize partitions with immediate visual feedback
- Non-destructive resizing when possible to preserve data
- Support for many file systems including those from Windows and Linux
- Boot camp compatibility for Windows partitions
- Partition verification to prevent errors
- Helpful wizards for common tasks like splitting drives
- Clear error prevention with warnings about risky operations
Writer’s Tip
When choosing disk partition manager software for Mac, think about your skill level. Advanced tools offer more features but have steeper learning curves. Beginners might want to start with Disk Utility or iPartition before trying more complex options. Consider what tasks you’ll do most often. Some tools excel at specific jobs but lack features in other areas.
Always run the latest version of your chosen partition software. Updates often fix bugs that could cause problems. Also, never try to partition your startup disk while running from it. Use a bootable drive or the recovery partition for such tasks. For important systems, test your partition changes on a spare drive first. This lets you practice without risk to your main system.
Conclusion
The best disk partition manager software for Mac makes organizing your storage easy. Whether you need basic tools or advanced features, there’s an option for you. Each of the five tools we covered has strengths for different users. Take time to assess your needs before choosing. The right tool depends on your specific situation.
For most Mac users, starting with Disk Utility makes sense. If you need more features, consider one of the other options. Remember to back up your data before any partition work. With the right disk partition manager software for Mac, you can optimize your storage safely. Your Mac will run better with well-organized storage. Good partition management is an important part of system maintenance.
FAQs
Can I resize my Mac startup partition without losing data?
Yes, the best disk partition manager software for Mac can resize your startup partition safely. Always back up first to be safe. Use Disk Utility for simple resizing or try Paragon or iBoysoft for more complex jobs. Never force-quit during the resize process. The software moves your data around to make space. This process can take hours for large drives. Make sure you have enough free space before starting. At least 15-20% free space makes the process smoother.
How many partitions should I create on my Mac?
Most Mac users need only 2-3 partitions. One for your system, one for data, and maybe one for backups. Creating too many partitions can waste space. The best disk partition manager software for Mac will let you change your mind later if needed. Each partition needs some overhead space. With too many partitions, this overhead adds up. Consider using folders instead of partitions for organizing smaller groups of files. Save partitions for major separations like system vs. data.
Is it safe to use third-party disk partition tools on my Mac?
Yes, if you choose well-established software. Stick to the best disk partition manager software for Mac with good reviews. Always back up your data first. Follow instructions carefully. Most problems happen from user errors, not software bugs. Reputable companies test their products thoroughly. They also provide support if things go wrong. Free tools from unknown sources carry more risk. The paid options in our list have good safety records. They include features to prevent common mistakes.
Why is disk partitioning needed?
Most computers already come with a single partition on their hard drive. However, as discussed earlier, keeping all files together is a risky affair. If something were to happen to the partition’s index file (the file keeping a list of where all your data is), it would become impossible to access your data even if you try to boot off your computer with a recovery disk.
If the operating system and the rest of the data are kept separately on different units, you can easily back up your data (documents, files, music and alike). Also, if the primary boot partition on your Mac, either Macintosh HD or Boot Camp is getting full, your OS will run like a sloth. Nobody wants that. The solution is to rearrange space between volumes. You do this by resizing the Macintosh and for that you need a disk partition manager for Mac.
How to do disk partitioning?
There are two ways to partition a disk. You can either use the Disk Utility default app manager on your computer or get a third party disk partition software for Mac. It can be a free partition manager or a paid one. However, the Disk Utility has limited functions and isn’t helpful when you need to do advanced partitioning. Whereas, with third party partition management software programs, you can easily create, delete, shrink, expand, or combine an endless number of partitions on the hard drive and storage devices alike.
What is disk partitioning?
Putting all your eggs in one basket is never a good idea. Similarly, keeping all your files, applications and the operating system in one drive could end up badly for you in case of an accident, be it that you end up reinstalling the OS. The best is to keep your files and data in different partitions on your drive.
To partition a computer hard drive means to separate a physical hard drive into multiple independent logical sections. It is basically like creating a filing system for your data on your Mac. Hard drives are containers of empty unallocated space that needs to be partitioned before put to use.
You cannot start writing files on a blank drive. At least one container or partition with a file system needs to be created first. Create 15 partitions if you need if you want your data to be filed and kept properly but making one is a necessity.
Author Bio:
Dinesh Lakhwani 

Dinesh Lakhwani, the entrepreneurial brain behind “TechCommuters,” achieved big things in the tech world. He started the company to make smart and user-friendly tech solutions. Thanks to his sharp thinking, focus on quality and the motto of never giving up, TechCommuters became a top player in the industry. His commitment to excellence has propelled the company to a leading position in the industry.
Popular Post


Recent Post
How To Get More Storage On PC Without Deleting Anything [2025]
Running out of space on your PC is frustrating. You might think deleting files is the only way. But that’s not true. There are many ways to get more storage without losing your important data. Learning how to get more storage on PC can save you time and stress. These methods work well and keep […]

How To Speed Up An Old Laptop [Windows 11/10]: Complte Guide
Is your old laptop running slowly? You’re not alone. Many people face this issue as their computers age. Learning how to speed up an old laptop is easier than you think. Over time, older laptops tend to slow down for a variety of reasons. Fortunately, with a few smart tweaks, you can significantly boost their […]

How To Reset Your PC For A Fresh Start In Windows 11/10 [2025]
Is your Windows computer lagging or behaving unpredictably? Are you constantly dealing with system errors, crashes, or sluggish performance? When troubleshooting doesn’t help, performing a full reset might be the most effective way to restore stability. Resetting your PC clears out all installed applications, personal files, and custom settings. It restores the system to its […]

How To Adjust Display Brightness Settings Easily in Windows [2025]
If your screen is overly bright or dim, it can strain your eyes and make tasks uncomfortable. Fortunately, Windows offers simple tools to fine-tune your display brightness. Despite how easy it is, many users aren’t aware of these quick fixes. Windows has many built-in tools to help you. You can change brightness with just a […]
How to Uninstall Problematic Windows Updates Easily [2025]
Learn how to uninstall problematic Windows updates easily. 5 proven methods to fix crashes, boot issues & performance problems. Simple step-by-step guide.

15 Most Essential Windows 11 Privacy And Security Settings [2025]
Learn 15 essential Windows 11 privacy and security settings to protect your data. Master computer privacy settings with simple steps to manage privacy settings effectively.

Rename Your Device For Better Security Windows [Windows 11 & 10]
Learn to rename your device for better security Windows 11 & 10. Simple steps to protect your computer from hackers. Improve privacy and security now.

How To Adjust Display Appearance Settings Easily in Windows 11/10
Learn to adjust display appearance settings easily Windows offers. Simple guide covers brightness, scaling, resolution & multi-monitor setup for better screen experience.

Supercharge Your Productivity: A Solopreneur’s and SMB’s Guide to Mastering Google Workspace with Gemini’
Picture this. It’s Monday morning. You open your laptop. Email notifications flood your screen. Your to-do list has 47 items. Three clients need proposals by Friday. Your spreadsheet crashed yesterday. The presentation for tomorrow’s meeting is half-finished. Sound familiar? Most small business owners live this reality. They jump between apps. They lose files. They spend […]

9 Quick Tips: How To Optimize Computer Performance
Learn how to optimize computer performance with simple steps. Clean hard drives, remove unused programs, and boost speed. No technical skills needed. Start today!