
How to Enable or Disable USB Port in Windows 7
Last updated on December 7th, 2024 at 9:47 am
There are numerous different easy methods available to enable or disable the USB port in your Windows-based laptop or computer. So, let’s protect your vital files and information by adopting any of the following methods.
Methods to Enable or Disable USB Ports in Windows 7
Enabling and disabling the USB port feature in your system means that nobody can insert a USB drive into your device and save data in it. This feature can be enabled and disabled pretty quickly.
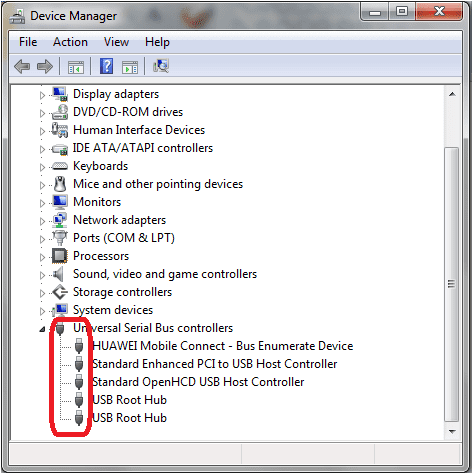
Method 1: Use of Device Manager
Okay, so you can block or unblock USB port insertion from your Windows computer very smoothly with the assistance of Device Manager. You have to follow these steps to implement this method;
Step 1: Just right-click anywhere on your My Computer icon present on your desktop, then click on the Manage option.
Step 2: Then a new similar-looking pop-up menu will appear on your screen and now on the left side the option Device Manager should be selected.
Step 3: Here, you have to search for the Universal Serial Bus Controllers option.
Step 4: Under Universal Serial Bus Controllers, you should select all the devices and press right-click again to either disable or enable the feature. Test to check whether the feature is working or not.
Special Note – If the port feature isn’t working yet, then restart your system. You have to manually enable that Device later even if you reboot your computer still it won’t automatically enable USB ports.
Also Read: How to Recover Permanently Deleted Files in Windows 10/8/7
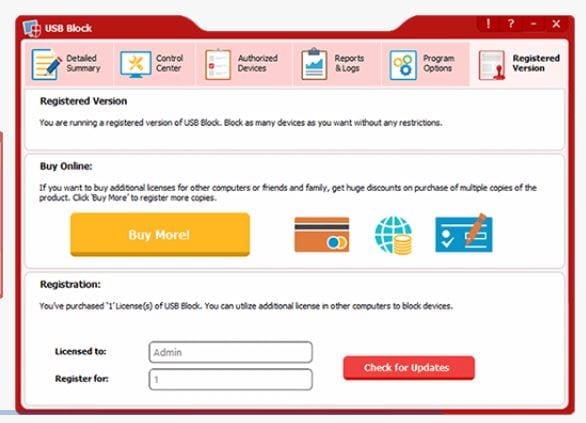
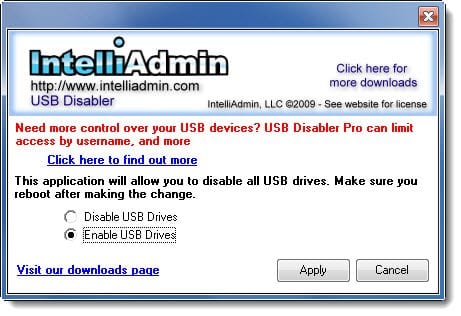
Method 2: Use Third-Party Software
If you want to disable the USB ports on your computer and you are not satisfied with the internal methods, then you can use the third-party software on your computer. The third-party software will easily block the USB port feature from your system with this downloaded software. The software can be downloaded from the different sources available online. This software will make your enabling and disabling process super simple.
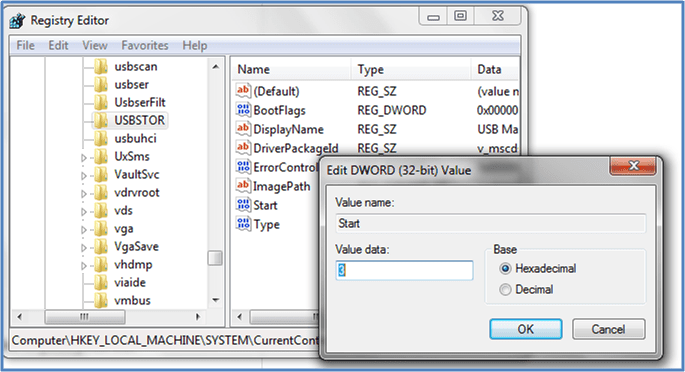
Method 3: Use Mass Storage Drivers with the Registry
This method has been popularly used by Windows users as the process of enabling and disabling USB ports is very fast. It is an effective method as compared to the other methods. If you are a smart user, then the register setting will save up your lots of time for you. Follow the lead to start the process;
Step 1: You have to go to your desktop and press “Win Button + R”. There, you have to type the command “Regedit” and press the OK Button.
Step 2: Here, you have to prompt a Window, for this you have to follow this written command;
HIKEY_LOCAL_MACHINE -> SYSTEM -> CURRENT CONTROL SET -> SERVICES -> USBSTOR
Step 3: Now, you have to go to the START work area. In this section, to enable or disable the USB port, you just have to change the Value data with 4 Next Time if you want to enable the port, then change the Value to 3, but remember after every change the value will close your Registry Editor.
Method 4: Uninstall your USB Mass Storage Drive
In administrative organizations like schools or colleges, the best solution to disable the USB ports is to uninstall each and every USB driver installed in the system. This method is an extreme step that should be only taken by the user who never wants to transfer data via USB ports. So, use this step as your last resort. However, if you ever want to reinstall drivers, then Windows will automatically search for USB port drivers and you can again transfer data using USB.
Method 5: Use BuduLock
This is free software available online that can lock any defined folder and block unauthorized access to the USB ports. Basically, the software blocks USB ports and lock folders with alphanumeric passwords. It is a very useful tool that you can operate as;
Step 1: Obviously, first you have to download BuduLock on your Windows computer and install it properly.
Step 2: Now, you should insert a USB drive on your Windows computer.
Step 3: You need to click on the Flash Drive Lock that is located behind the Folder Lock Option.
Step 4: Here, by pressing on the Disable Flash Drive, you can block your USB ports. Similarly, if you want to enable the feature, then you have to press Enable Flash Drive and insert your password.
Method 6: Disable USB Ports
This is again an adverse solution as it’s not possible to disable all of your USB ports from the motherboard. But, you can easily remove the one port which is located on the front of your CPU. However, if you want to disconnect the USB port from the top and front of the computer, then you can plug out the cable from the USB header. You can effortlessly remove the USB header to protect your vital data from getting misused.
Method 7: Try Microsoft Support
If you are in real trouble and your USB ports aren’t working even after changing the previous settings as we have discussed above, then here you probably have one option – contact Windows Service Support which is Microsoft Fix it 50061. You just need to apply the setup, and it will fix your problems subsequently.
So, readers, these are some direct and indirect methods to enable or disable USB ports in your Windows 7 or above OS. We have explained every method in brief, but still, if you require any assistance, then just ask in the comments.
Author Bio:
Dinesh Lakhwani 

Dinesh Lakhwani, the entrepreneurial brain behind “TechCommuters,” achieved big things in the tech world. He started the company to make smart and user-friendly tech solutions. Thanks to his sharp thinking, focus on quality and the motto of never giving up, TechCommuters became a top player in the industry. His commitment to excellence has propelled the company to a leading position in the industry.
Popular Post


Recent Post
How To Get More Storage On PC Without Deleting Anything [2025]
Running out of space on your PC is frustrating. You might think deleting files is the only way. But that’s not true. There are many ways to get more storage without losing your important data. Learning how to get more storage on PC can save you time and stress. These methods work well and keep […]

How To Speed Up An Old Laptop [Windows 11/10]: Complte Guide
Is your old laptop running slowly? You’re not alone. Many people face this issue as their computers age. Learning how to speed up an old laptop is easier than you think. Over time, older laptops tend to slow down for a variety of reasons. Fortunately, with a few smart tweaks, you can significantly boost their […]
How To Reset Your PC For A Fresh Start In Windows 11/10 [2025]
Is your Windows computer lagging or behaving unpredictably? Are you constantly dealing with system errors, crashes, or sluggish performance? When troubleshooting doesn’t help, performing a full reset might be the most effective way to restore stability. Resetting your PC clears out all installed applications, personal files, and custom settings. It restores the system to its […]

How To Adjust Display Brightness Settings Easily in Windows [2025]
If your screen is overly bright or dim, it can strain your eyes and make tasks uncomfortable. Fortunately, Windows offers simple tools to fine-tune your display brightness. Despite how easy it is, many users aren’t aware of these quick fixes. Windows has many built-in tools to help you. You can change brightness with just a […]
How to Uninstall Problematic Windows Updates Easily [2025]
Learn how to uninstall problematic Windows updates easily. 5 proven methods to fix crashes, boot issues & performance problems. Simple step-by-step guide.

15 Most Essential Windows 11 Privacy And Security Settings [2025]
Learn 15 essential Windows 11 privacy and security settings to protect your data. Master computer privacy settings with simple steps to manage privacy settings effectively.
Rename Your Device For Better Security Windows [Windows 11 & 10]
Learn to rename your device for better security Windows 11 & 10. Simple steps to protect your computer from hackers. Improve privacy and security now.

How To Adjust Display Appearance Settings Easily in Windows 11/10
Learn to adjust display appearance settings easily Windows offers. Simple guide covers brightness, scaling, resolution & multi-monitor setup for better screen experience.

Supercharge Your Productivity: A Solopreneur’s and SMB’s Guide to Mastering Google Workspace with Gemini’
Picture this. It’s Monday morning. You open your laptop. Email notifications flood your screen. Your to-do list has 47 items. Three clients need proposals by Friday. Your spreadsheet crashed yesterday. The presentation for tomorrow’s meeting is half-finished. Sound familiar? Most small business owners live this reality. They jump between apps. They lose files. They spend […]

9 Quick Tips: How To Optimize Computer Performance
Learn how to optimize computer performance with simple steps. Clean hard drives, remove unused programs, and boost speed. No technical skills needed. Start today!