
How to Fix an Error Connecting to the Apple ID Server?

Last updated on January 31st, 2025 at 6:34 am
Introduction
Users need to register and log in with their Apple ID to work with Apple devices. However, people sometimes notice an issue with Apple ID Server, such as while trying to log into their iCloud account. Even iTunes and App Store sections show the ID verification problem and do not allow login attempts.
However, the error Connecting to the Apple ID Server prompt is due to verification server-centric issues. There are different solutions to fix the problem- here, we present them in a list.
Ways to Fix the Error Connecting to Apple ID Server Issue
Multiple solutions exist to try to fix the issue with Apple ID Server. These occur due to problems in internet connection, certification settings, keychain access, or device time settings, among others.
Carefully find the leading cause for this in your case and follow the proper steps to fix that particular problem. We have compiled the most common solutions for rectifying this error on iOS and macOS products.
Fix 1: Check to See the Status of Apple Servers
When the prompt for the error Connecting to the Apple ID Server comes up, the first thing you should consider is seeing the condition of the servers. If they are down, this error may occur. Wait for it to activate again if the servers are inactive at the moment.
How to do this?
Step 1: Go to the official site of Apple.
Step 2: Find and open Support.
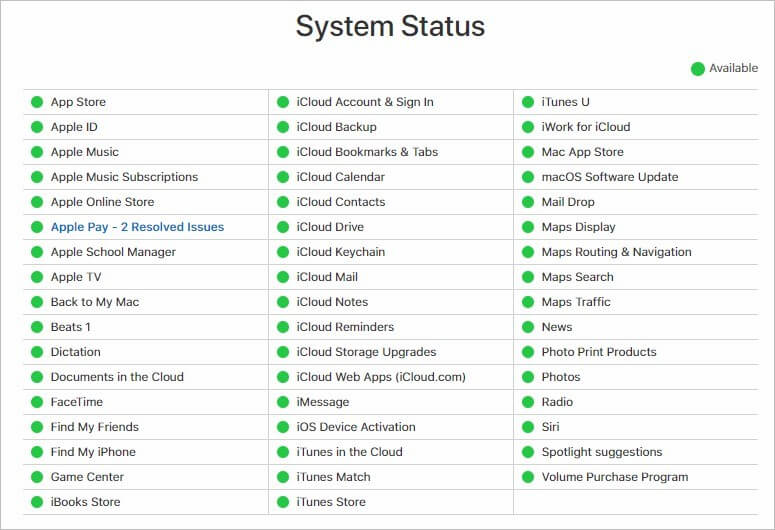
Step 3: Search for the “System Status” option and choose the first hyperlink choice. A list of all available Apple services, App Store, and iCloud servers will appear.
Step 4: See the icon indicator beside the services listed. Those that are green are active. However, they are unavailable if a service shows orange, yellow, or red colors beside them.
Fix 2: Acquire the latest iOS/iPadOS Software update from Apple
The reason why one cannot connect to the Apple ID Server can happen since the old available software is outdated in comparison to newer technologies in use. This can cause glitches and bugs and even affect the device security protocols. In this situation, you should upgrade the OS of your Apple device to the latest available software version from the official Apple site.
To note, some users notice the connection issue after they complete the software update process. This happens when the new version is incompatible with the available programs, so returning to the previous OS version will benefit here.
Fix 3: Evaluate all Internet Connections and Link with Another One
The error Connecting to the Apple ID Server issue can come up due to a disconnected network condition. To check if that is the case, you should try streaming online content or using any regular network-based service. To fix the problem, you should connect your device with another network service provider, e.g., WiFi.
How to do this?
Step 1: On your iPhone device, go to the Home screen.
Step 2: Press Settings > WiFi.
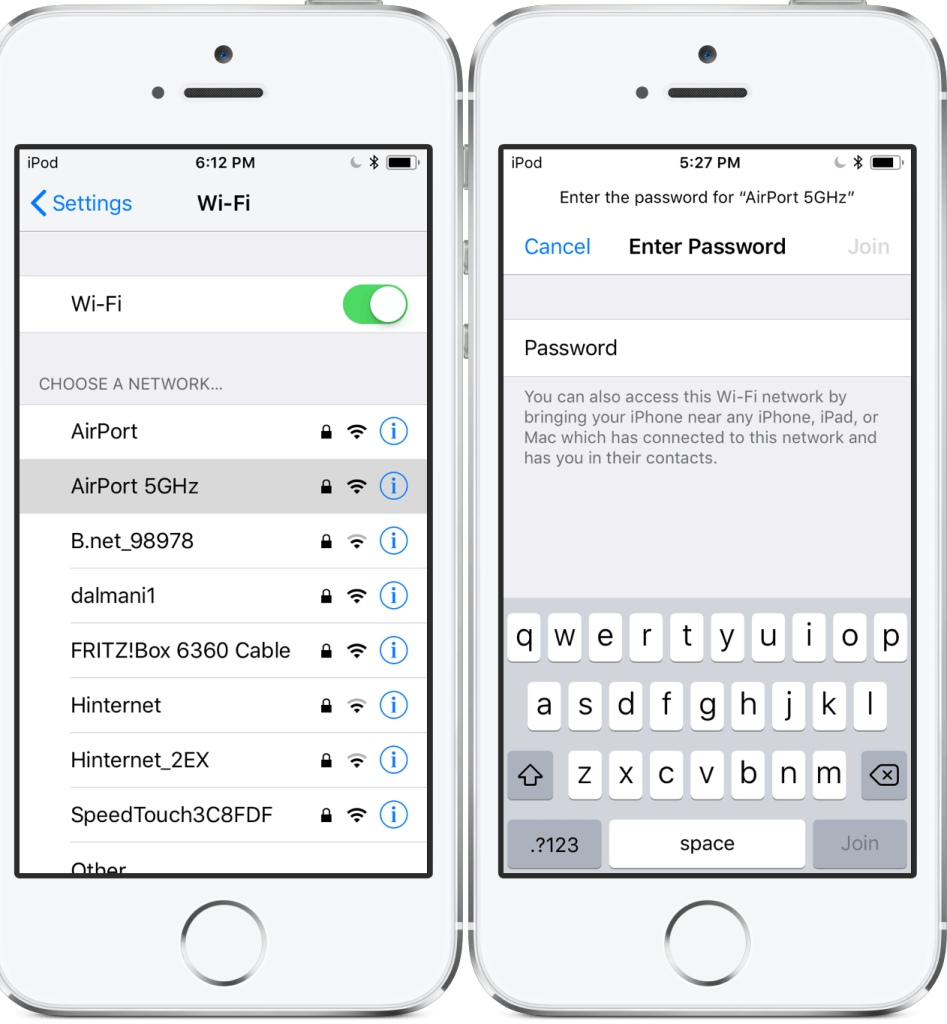
Step 3: Turn the WiFi connection on, and all the available networks will appear automatically.
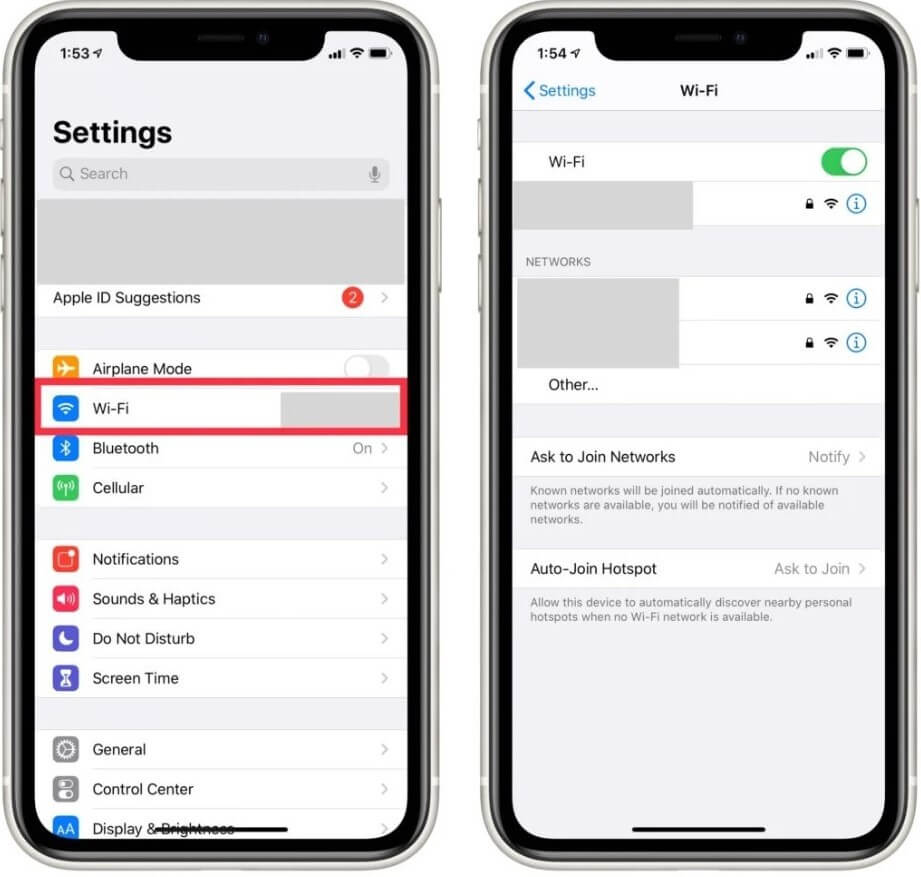
Step 4: Choose the WiFi network to connect with. Add the Password and then click on the Join button.
Fix 4: Sign Out of your Apple ID and Sign in Again
An easy solution to fix the connection error with Apple ID is to entirely sign out from the account. Then, you can try to log in with the Apple ID. It can remove the connection failure issue in some cases.
Step 1: Open iPhone and access the Settings app > Press the “iTunes & App Store” option.
Step 2: Tap on the Apple ID and click the Sign Out button.
Step 3: Then, tap the Sign In button again > Add your Apple ID and Password. This should fix the issue.
Fix 5: Disable the VPN connection
Many users opt for VPN software for privacy protection and better browsing performance. Plus, with top-grade solutions like ExpressVPN, it is possible to connect to global servers and access various sites and content, even those that are geographically blocked.
However, sometimes, having an active VPN can interfere with system factors, like updating the settings for Apple ID. Turning the VPN software off will be best, and then logging in with the Apple ID again.
Fix 6: Make a Verification code request for Apple ID
One of the common reasons for the Apple ID Server-based connection error is a temporary bug in the system. If this is the leading cause in your case, we suggest you sign into iCloud.com or another device with the Apple ID. To do so, you will need the verification code from Apple. You can get this code without using the iPhone device if you use System Preferences first.
How to do this?
Step 1: On your Mac, click on System Preferences > Choose the “Apple ID” option.
Step 2: Open the tab of Password & Security.
Step 3: Tap the “Get a Verification Code” option.
Step 4: The code will appear on the screen > Press OK and copy it.
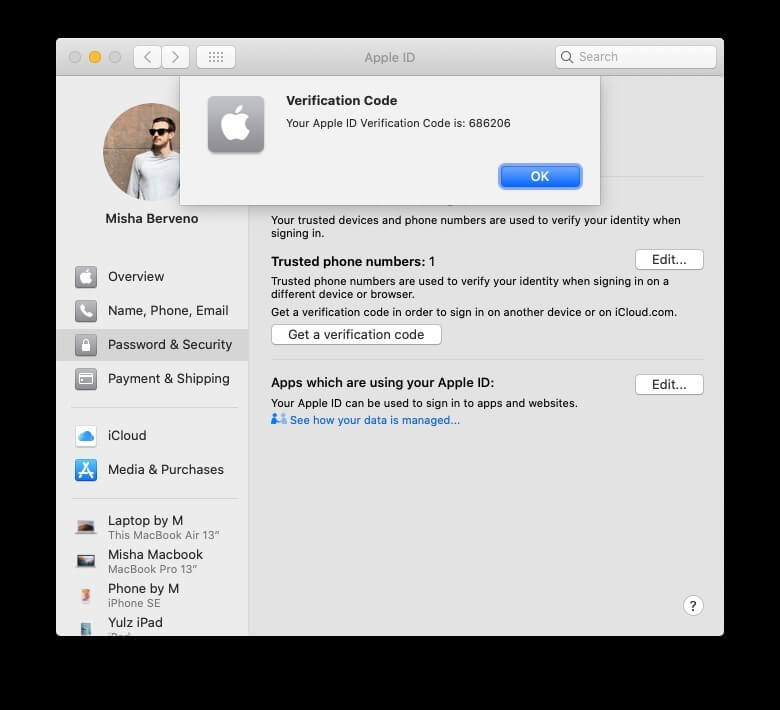
Step 5: While trying to sign in via iCloud.com, use this code.
Fix 7: Upgrade the macOS software
Due to an outdated condition of the macOS software in a device, users might get the error Connecting to the Apple ID Server problem. It is typically enough to restart the Mac device from the Apple logo on the Homepage menu bar. Or, you have to install the most recent available macOS version update.
How to do this?
Step 1: Open your Mac device settings and click on the System Preferences menu.
Step 2: Press the Software Update option.
Step 3: Hit Download > Install.
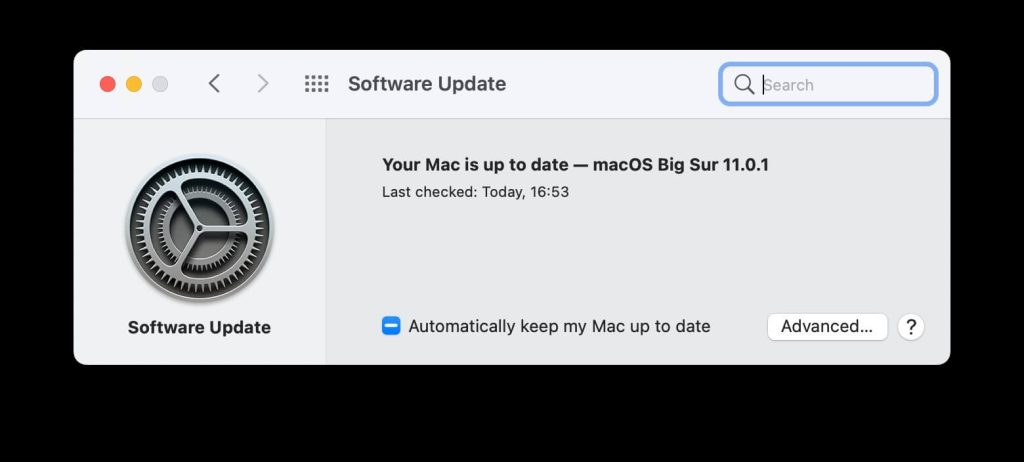
Step 4: After the macOS is updated, restart the device.
Step 5: Press on the ⌘ > Option > R keys. Hold until the spinning globe appears, and then release them.
Step 6: Choose the “Reinstall macOS” option > Continue.

Step 7: Follow the on-screen instructions for installation to complete.
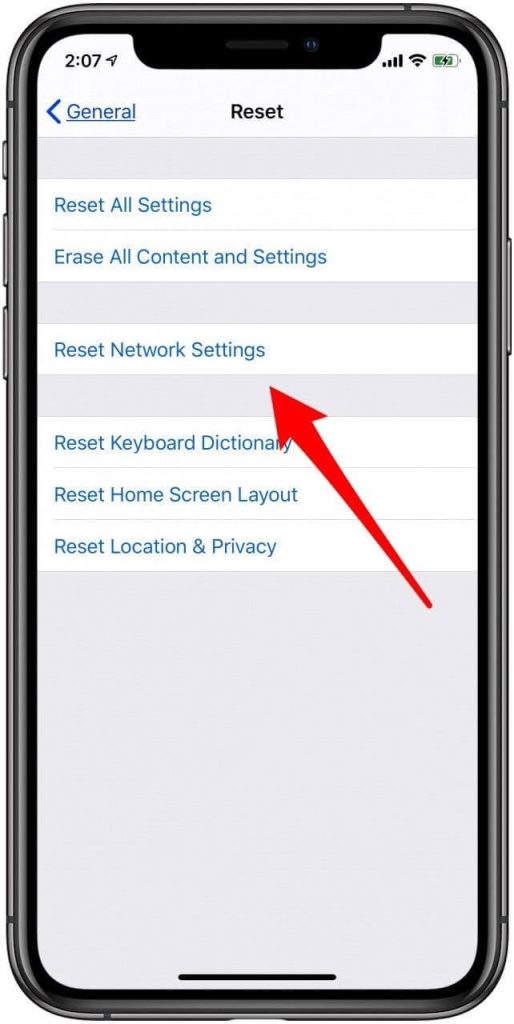
Fix 8: Reset the Network Setting Completely
Sometimes, the error Connecting to the Apple ID Server occurs since users can not link their device to their available internet network. After checking your cellular connection and WiFi, if they seem relatively normal, you might need to reset the Network Settings to rectify any compatibility issue.
Keep in mind that this process involves changing cellular data connection settings. Plus, you will not have access to any of the WiFi networks you joined before- logging in again is necessary.
How to do this?
Step 1: On your iPhone device, click on Settings > General.
Step 2: Tap on the Reset button.
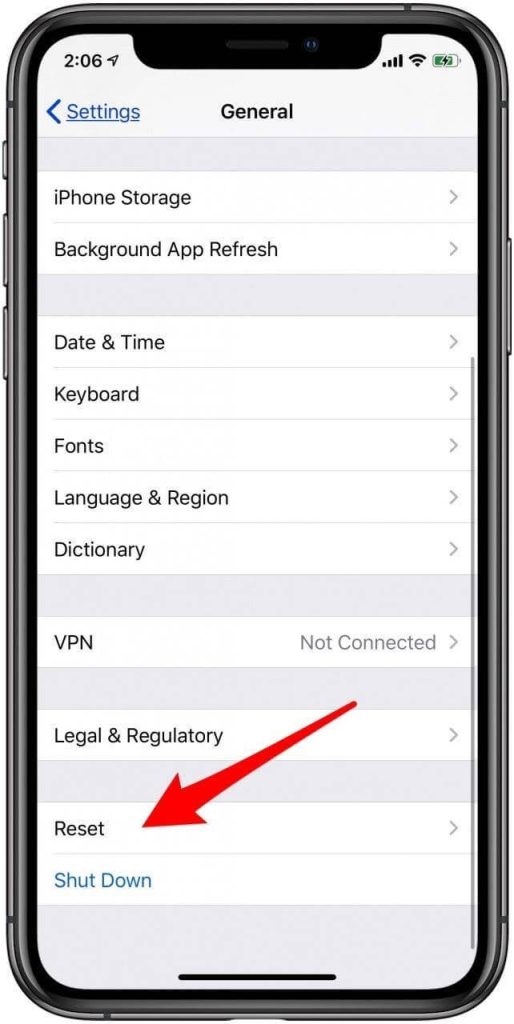
Step 3: Next, press the “Reset Network Settings” option.
Step 4: Add Password> Press the Reset Network Settings button.
Fix 9: Update the Settings for Data and Time on the Device
The connection issue with the Apple ID Server can sometimes happen since the time, date, or location data is inaccurate on the device. Therefore, to fix this error, you should use update these settings to the current local time and data information.
How to do this?
Step 1: On the iPhone device, access Settings > General.
Step 2: Choose the “Date & Time” option from the following menu.
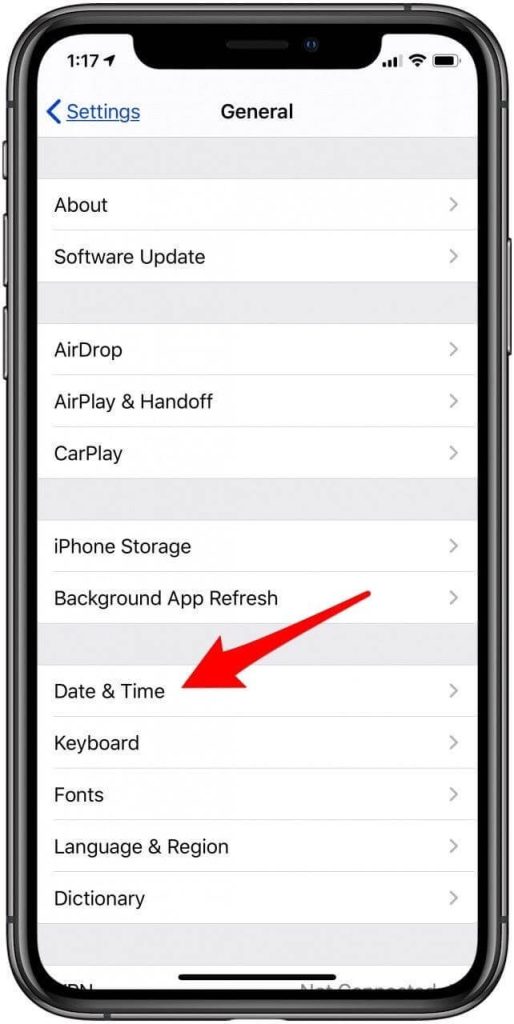
Step 3: Turn the toggle beside “Set Automatically” to ON. If this is already enabled when you open it, turn the toggle to OFF and back to ON.

Fix 10: Force Restart the iPhone device
If settings or cache are available in the system, that can cause problems in the regular system functions. For the issue with the Apple ID Server, you should try force restarting the device to stop the verification failed issue. This works well in cases where the user does not know the exact cause for the problem as well.
- iPhone 6s devices and earlier models– Press and hold the Home + Side buttons together until the screen shows the Apple logo.
- iPhone 7 device– Press and hold the Volume Down + Side buttons in the device for 10 seconds. When the Apple logo appears, release your hold.
- iPhone X/8 devices and later models– Press down the Volume Up button and release instantly. Repeat the same for the Volume Down button. Then, press down on the Side button on your device until the Apple logo comes up.
Bonus: Clear your App Caches and Junk with Third-Party Tool
If there is excessive cache and junk files in apps on your Mac device, you should focus on removing them all. These can cause the system problems like server connection or verification failure problems.
The application effectively cleans out junk items from all corners of the system and optimizes performance. It removes unnecessary files after a full-scale intensive system scan, such as broken downloads, outdated caches, useless localizations, and logs. Plus, it removes litter from apps like Photos, Mail, and iTunes, improving performance quality.
Conclusion
Overall, it would be best to use the different sequences mentioned here to effectively rectify the error for verification server access. Whether you decide to Force Reboot your Mac/iPhone/iPad or update the network settings or Password, you should try these solutions out to see which fit different situations. Then, follow the steps mentioned.
Author Bio:
Dinesh Lakhwani 

Dinesh Lakhwani, the entrepreneurial brain behind “TechCommuters,” achieved big things in the tech world. He started the company to make smart and user-friendly tech solutions. Thanks to his sharp thinking, focus on quality and the motto of never giving up, TechCommuters became a top player in the industry. His commitment to excellence has propelled the company to a leading position in the industry.
Popular Post


Recent Post
How To Run a Troubleshooter For PC Issues on Windows [Windows 11/10]
Dealing with computer issues can be a real hassle. Slow performance, system crashes, and unexpected error messages often get in the way. Fortunately, Windows includes built-in tools designed to diagnose and resolve these problems efficiently. Learning to run a troubleshooter for PC issues on Windows can save you time and money. You don’t need to […]

How To Get More Storage On PC Without Deleting Anything [2025]
Running out of space on your PC is frustrating. You might think deleting files is the only way. But that’s not true. There are many ways to get more storage without losing your important data. Learning how to get more storage on PC can save you time and stress. These methods work well and keep […]

How To Speed Up An Old Laptop [Windows 11/10]: Complte Guide
Is your old laptop running slowly? You’re not alone. Many people face this issue as their computers age. Learning how to speed up an old laptop is easier than you think. Over time, older laptops tend to slow down for a variety of reasons. Fortunately, with a few smart tweaks, you can significantly boost their […]

How To Reset Your PC For A Fresh Start In Windows 11/10 [2025]
Is your Windows computer lagging or behaving unpredictably? Are you constantly dealing with system errors, crashes, or sluggish performance? When troubleshooting doesn’t help, performing a full reset might be the most effective way to restore stability. Resetting your PC clears out all installed applications, personal files, and custom settings. It restores the system to its […]

How To Adjust Display Brightness Settings Easily in Windows [2025]
If your screen is overly bright or dim, it can strain your eyes and make tasks uncomfortable. Fortunately, Windows offers simple tools to fine-tune your display brightness. Despite how easy it is, many users aren’t aware of these quick fixes. Windows has many built-in tools to help you. You can change brightness with just a […]

How to Uninstall Problematic Windows Updates Easily [2025]
Learn how to uninstall problematic Windows updates easily. 5 proven methods to fix crashes, boot issues & performance problems. Simple step-by-step guide.

15 Most Essential Windows 11 Privacy And Security Settings [2025]
Learn 15 essential Windows 11 privacy and security settings to protect your data. Master computer privacy settings with simple steps to manage privacy settings effectively.
Rename Your Device For Better Security Windows [Windows 11 & 10]
Learn to rename your device for better security Windows 11 & 10. Simple steps to protect your computer from hackers. Improve privacy and security now.

How To Adjust Display Appearance Settings Easily in Windows 11/10
Learn to adjust display appearance settings easily Windows offers. Simple guide covers brightness, scaling, resolution & multi-monitor setup for better screen experience.

Supercharge Your Productivity: A Solopreneur’s and SMB’s Guide to Mastering Google Workspace with Gemini’
Picture this. It’s Monday morning. You open your laptop. Email notifications flood your screen. Your to-do list has 47 items. Three clients need proposals by Friday. Your spreadsheet crashed yesterday. The presentation for tomorrow’s meeting is half-finished. Sound familiar? Most small business owners live this reality. They jump between apps. They lose files. They spend […]