
How To Fix MSMPeng.exe Antimalware Service Executable High CPU

Is your computer running slow? Is your fan making loud noises? You might be facing the msmpeng.exe antimalware service executable high CPU problem. This is a common issue. The msmpeng.exe process can sometimes use too many of your computer’s resources. This makes everything else run slowly.
Many people get frustrated when they see msmpeng.exe antimalware service executable taking up 50%, 80%, or even 100% of their CPU. It feels like your computer is fighting against you. But don’t worry. This problem has solutions.
In this guide, we’ll explain what the msmpeng.exe antimalware service executable is. We’ll show you why it sometimes causes high CPU usage. Most importantly, we’ll give you simple, step-by-step fixes. By the end, you’ll know how to keep your computer protected without the slowdowns.
Part 1: What is MSMPeng.exe?
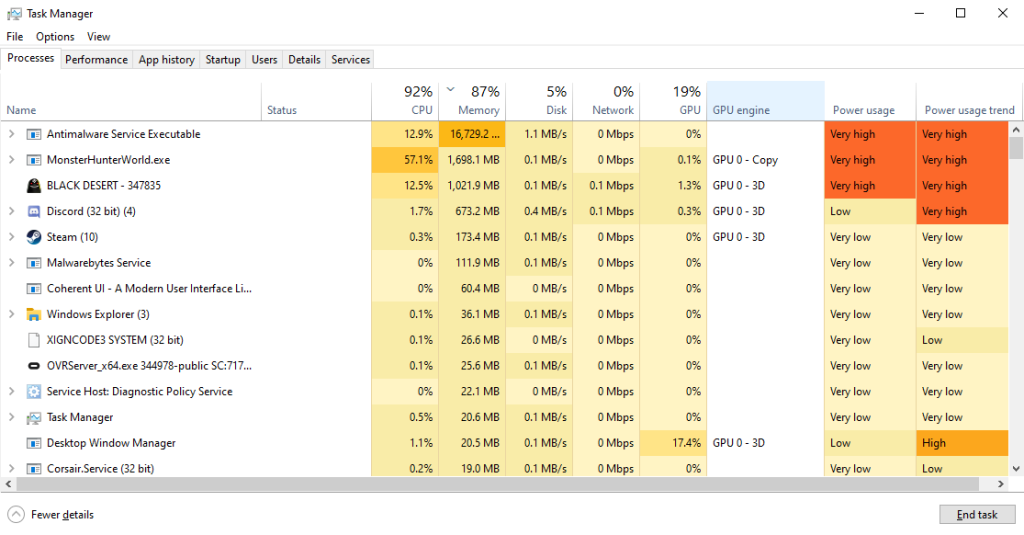
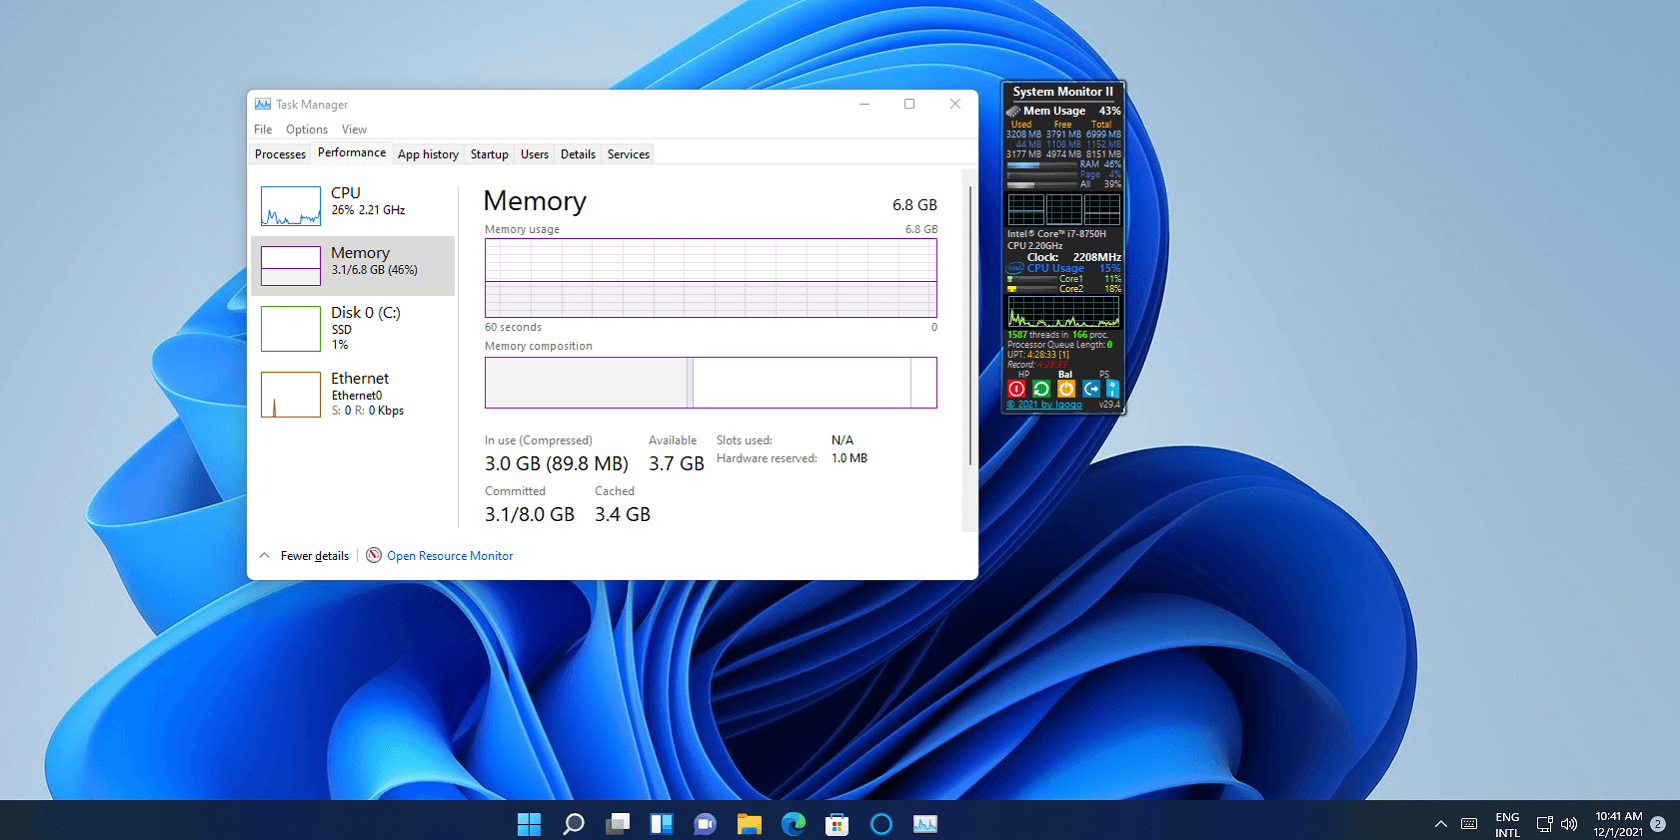
The MsMpEng.exe Antimalware Service Executable is a component of Windows Defender, Microsoft’s built-in security software designed to protect against viruses and other threats. Included for free with your Windows operating system, this process continuously runs in the background, ensuring your computer stays protected.
When you see msmpeng.exe antimalware service executable in Task Manager, it’s doing its job. It scans files and programs for threats. It checks for viruses when you download something new. It also runs scheduled scans of your entire system. All these tasks help protect your computer from harm.
Imagine the MsMpEng.exe Antimalware Service Executable as your computer’s security guard. Just like a real guard, it requires resources to perform its duties effectively. It relies on your CPU — the brain of your computer—to run scans and detect threats.
Most of the time, it operates discreetly in the background, but occasionally, it may need extra processing power to handle security tasks more thoroughly.
Part 2: What Causes the MSMPeng.exe Antimalware Service Executable Error
The msmpeng.exe antimalware service executable high CPU issue happens for several reasons.
Here are the main reasons why msmpeng.exe might use too much CPU:
- Full system scan – When Windows Defender runs a complete scan of your computer, it needs lots of processing power.
- Real-time protection – Constant checking of every file you open can strain your system resources.
- Outdated Defender definitions – Old virus definition files can make scans less efficient.
- Too many files to scan – Having many files in download folders or temporary directories makes scans take longer.
- Conflicts with other antivirus programs – Running multiple security programs can cause them to fight for resources.
- Windows Update issues – Problems with updates can affect how Windows Defender works.
- Corrupted system files – Damaged Windows files can make msmpeng.exe work harder than needed.
- Malware infection – Ironically, having actual malware can make Defender work overtime trying to remove it.
Part 3: Pros and Cons of Fixing this Error
Pros:
- Your computer will run faster and respond better.
- You’ll save battery life on laptops.
- Your computer fan won’t run as loudly.
- Programs will open and run more smoothly.
- You’ll still have protection against threats.
Cons:
- Some fixes might slightly reduce security if not done right.
- You’ll need to monitor your system more closely after changes.
- Some solutions require technical steps you might not be familiar with.
- You might need to repeat some fixes after major Windows updates.
Part 4: Precautions to Take While Fixing the MSMPeng.exe Antimalware Service Executable Error
Before trying to fix the MSMPeng.exe antimalware service executable high CPU issue, take these precautions. They’ll help ensure you don’t cause new problems while fixing this one.
- Back up important files – Always save your important data before making system changes.
- Create a restore point – This lets you undo changes if something goes wrong.
- Don’t disable Windows Defender completely – This would leave your computer unprotected.
- Download software only from official sources – Avoid risky websites when getting tools for fixes.
- Read instructions carefully – Make sure you understand each step before doing it.
- Start with simple fixes first – Try basic solutions before moving to more complex ones.
- Restart your computer between major changes – This helps ensure changes take effect properly.
- Keep track of what you changed – Write down your steps so you can reverse them if needed.
Part 5: Top Ways to Fix the msmpeng.exe Antimalware Service Executable Error
Here are six proven methods to fix the msmpeng.exe antimalware service executable high CPU problem. Try them in order, starting with the simplest solutions.
Fix 1: Schedule Scans During Idle Time
One easy way to reduce msmpeng.exe antimalware service executable error is to change when scans happen. Setting scans for times when you’re not using your computer helps a lot.
Windows Defender provides built-in options to customize scan schedules, allowing you to choose specific days and times for automatic scans. This ensures that system performance remains smooth when you need your computer for important tasks.
Configuring these settings properly can significantly improve efficiency and prevent unnecessary slowdowns caused by background antivirus processes.
Steps:
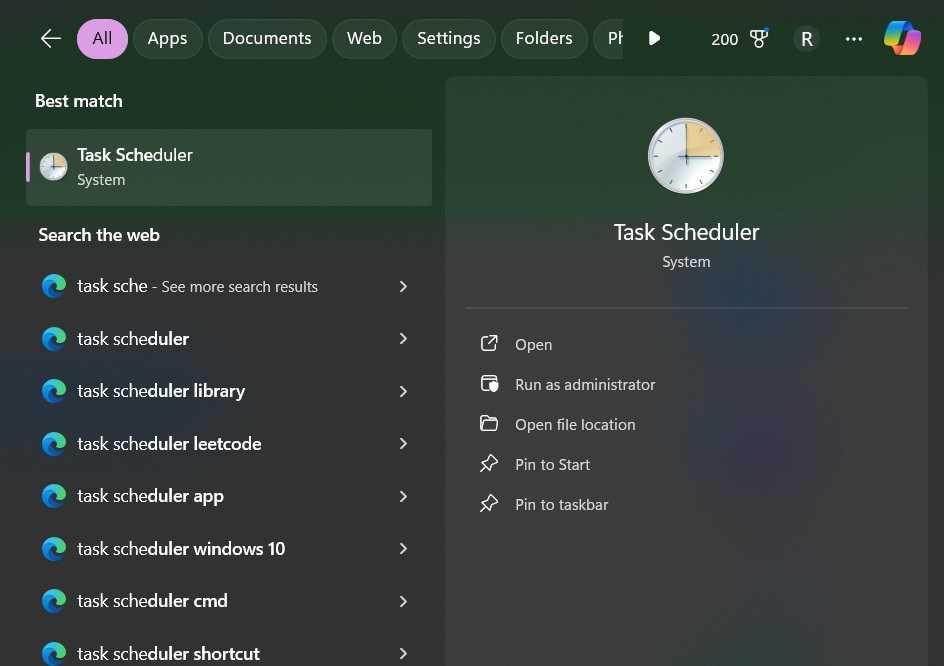
- Type “tasks” into the search bar and select Task Scheduler.
- In Task Scheduler, navigate to the Task Schedule Library from the top left corner.

- Open the Microsoft folder. Scroll down to Windows. Select Windows Defender from the left menu to view the current scan schedules. Double-click Windows Defender Scheduled Scan to open a new settings window.
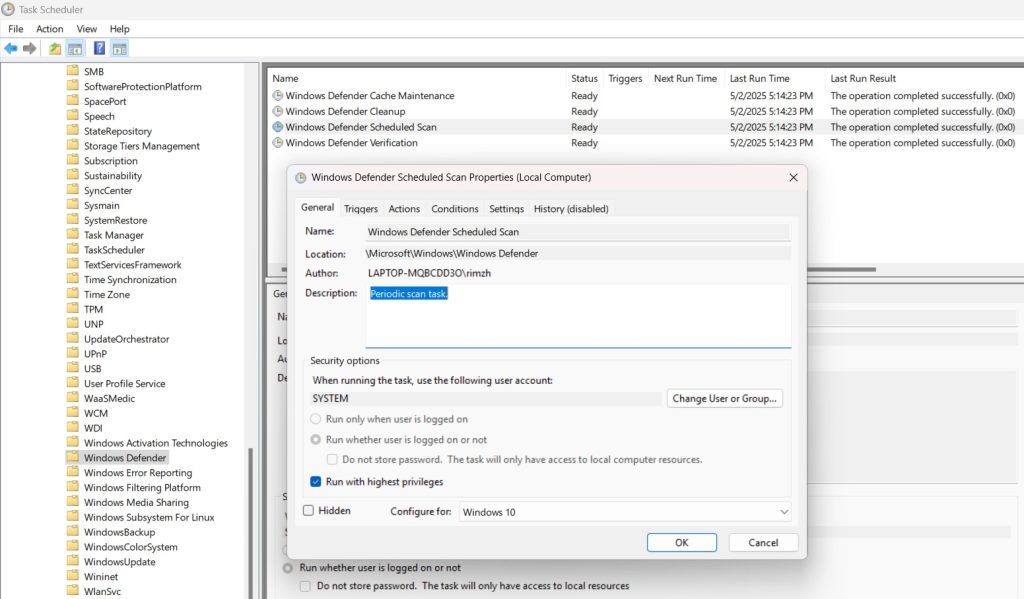
- Within this window, you’ll find various customization options under the Triggers section, allowing you to define scan criteria.
This will enable you to set your own scan schedule for Windows Defender Antivirus.
Fix 2: Add Exclusions to Windows Defender
The msmpeng.exe antimalware service executable works hard when scanning large files or folders. Telling it to skip certain safe locations can reduce CPU usage.
Adding exclusions means Windows Defender won’t scan those files or folders. Only do this for locations you trust completely.
Steps:
- Open Windows Security (as in Fix 1). Go to “Virus & threat protection”. Click “Manage settings” under “Virus & threat protection settings.”. Scroll down to “Exclusions” and click “Add or remove exclusions.”
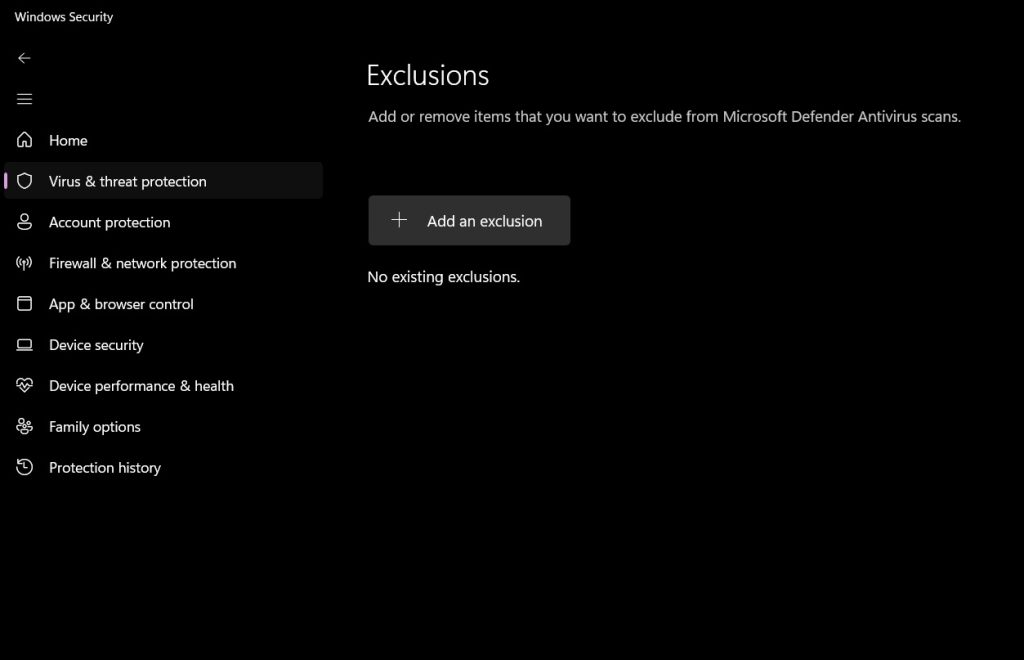
- Click the “+” button to add an exclusion. Choose the type: file, folder, file type, or process. Select what you want to exclude. Click “OK” to save.
Fix 3: Clean Up Temporary Files
Temporary files can build up over time. The msmpeng.exe antimalware service executable checks all these files during scans. Fewer files mean shorter scans and lower CPU usage.
Cleaning up junk files gives your computer more breathing room. It also makes Windows Defender’s job easier.
Steps:
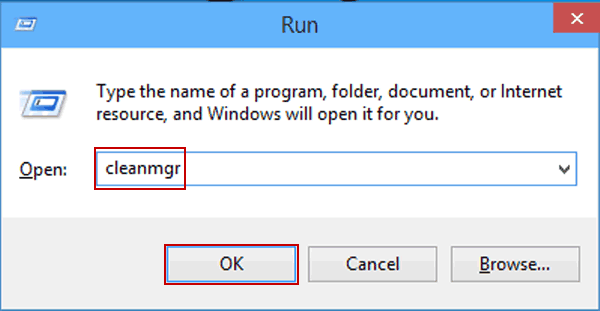
- Press Windows key + R. Type “cleanmgr” and press Enter.
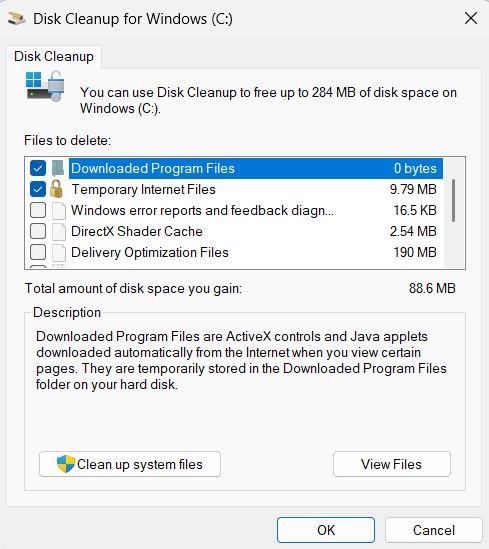
- Select your main drive (usually C:). Click “OK”. Check boxes for file types you want to delete. Click “OK” again. Confirm by clicking “Delete Files”. Wait for the cleanup to finish.
Fix 4: Update Windows Defender
Outdated virus definitions can make the MSMPeng.exe antimalware service executable work harder than needed. Keeping Windows Defender updated improves its efficiency.
Updates include better detection methods and optimizations. These help reduce CPU usage while maintaining protection.
Steps:
- Press Win + I to launch Windows Settings. Go to Windows Update: In the left-hand menu, click “Windows Update”.
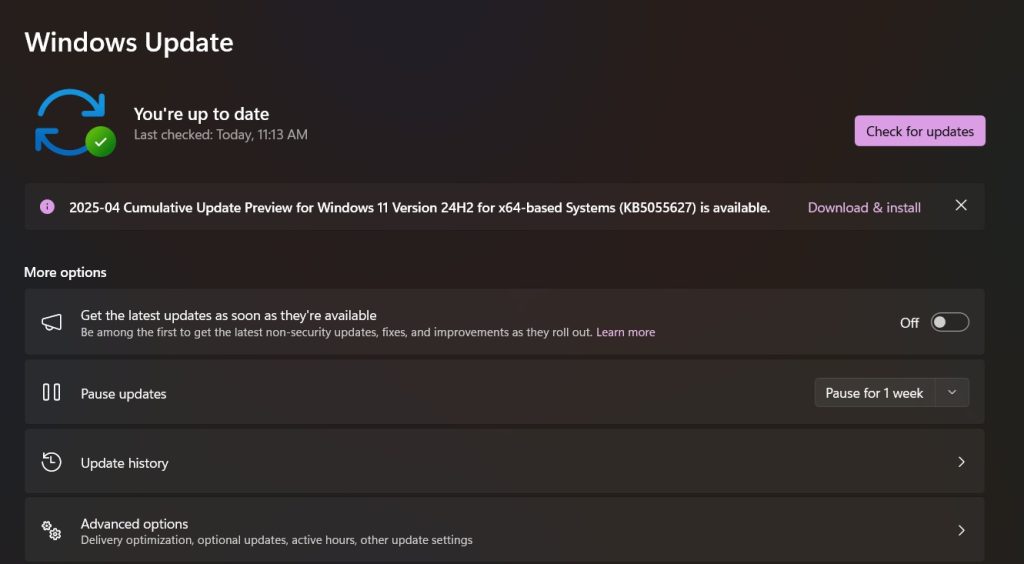
- Click “Check for updates” and install any available security updates.
Fix 5: Use Controlled Folder Access
Sometimes the msmpeng.exe antimalware service executable watches too many folders. Controlled folder access lets you focus protection on important locations only.
This feature protects specific folders from ransomware and other threats. It can reduce overall scanning activity.
Steps:
- Open Windows Security. Click “Virus & threat protection”. Scroll down to “Ransomware protection”. Click “Manage ransomware protection.”
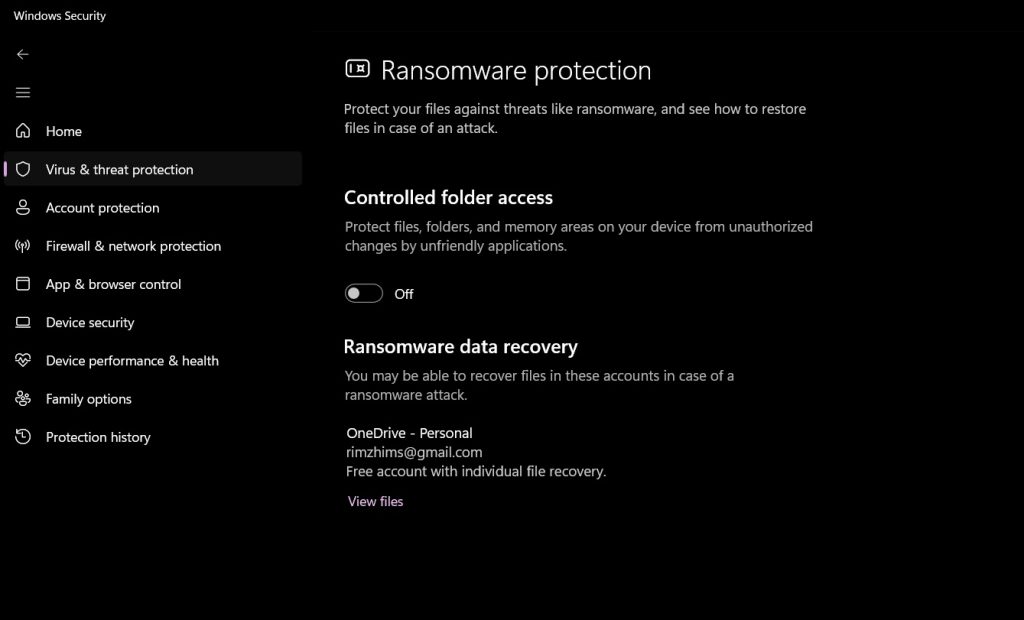
- Turn on “Controlled folder access”. Click “Protected folders” to see what’s included. Add or remove folders as needed.
Restart your computer
Fix 6: Adjust Windows Defender CPU Usage
For Windows 10 Pro users, you can limit how much CPU the msmpeng.exe antimalware service executable uses. This keeps protection running without slowing other tasks.
Group Policy Editor lets you set a maximum percentage for Windows Defender CPU usage.
Steps:
- Press Windows key + R. Type “gpedit.msc” and press Enter. Navigate to Computer Configuration > Administrative Templates > Windows Components > Windows Defender Antivirus > Scan. Find “Specify the maximum percentage of CPU utilization during a scan.”

- Double-click it and select “Enabled“. Set the CPU priority to “Low”. Click “Apply” then “OK”. Restart your computer
Conclusion
The msmpeng.exe antimalware service executable high CPU problem affects many Windows users. It can make your computer slow and frustrating to use. But as we’ve seen, several solutions exist. From scheduling scans to cleaning temporary files, you have options.
Remember that Windows Defender works to keep your computer safe. The msmpeng.exe process is not harmful, even when it uses high CPU. The key is finding the right balance between security and performance. You need protection, but not at the cost of a usable computer.
By following the fixes in this guide, you can reduce msmpeng.exe antimalware service executable CPU usage. Your computer will run faster while staying protected from threats. If one solution doesn’t work, try another. With patience, you’ll find the right fix for your situation.
FAQs
Is it safe to disable the MSMPeng. exe antimalware service executable?
No, completely disabling the msmpeng.exe antimalware service executable is not recommended. This would turn off Windows Defender, leaving your computer vulnerable to viruses and malware. Instead, use the methods in this article to reduce its CPU usage while keeping protection active.
Why does the MSMPeng.exe antimalware service executable use so much CPU at random times?
The msmpeng.exe process often spikes when it finds something suspicious or starts a scheduled scan. It might also use more CPU after you install new programs or download files. These are normal behaviors as Windows Defender works to check new content for threats.
Do I need Windows Defender if I have another antivirus program?
Generally, you should use only one active antivirus program at a time. If you install a third-party antivirus, Windows Defender usually turns itself off automatically. Having multiple antivirus programs running can cause conflicts and high CPU usage from the msmpeng.exe antimalware service executable.
Author Bio:
Dinesh Lakhwani 

Dinesh Lakhwani, the entrepreneurial brain behind “TechCommuters,” achieved big things in the tech world. He started the company to make smart and user-friendly tech solutions. Thanks to his sharp thinking, focus on quality and the motto of never giving up, TechCommuters became a top player in the industry. His commitment to excellence has propelled the company to a leading position in the industry.
Popular Post


Recent Post

How To Get More Storage On PC Without Deleting Anything [2025]
Running out of space on your PC is frustrating. You might think deleting files is the only way. But that’s not true. There are many ways to get more storage without losing your important data. Learning how to get more storage on PC can save you time and stress. These methods work well and keep […]

How To Speed Up An Old Laptop [Windows 11/10]: Complte Guide
Is your old laptop running slowly? You’re not alone. Many people face this issue as their computers age. Learning how to speed up an old laptop is easier than you think. Over time, older laptops tend to slow down for a variety of reasons. Fortunately, with a few smart tweaks, you can significantly boost their […]

How To Reset Your PC For A Fresh Start In Windows 11/10 [2025]
Is your Windows computer lagging or behaving unpredictably? Are you constantly dealing with system errors, crashes, or sluggish performance? When troubleshooting doesn’t help, performing a full reset might be the most effective way to restore stability. Resetting your PC clears out all installed applications, personal files, and custom settings. It restores the system to its […]

How To Adjust Display Brightness Settings Easily in Windows [2025]
If your screen is overly bright or dim, it can strain your eyes and make tasks uncomfortable. Fortunately, Windows offers simple tools to fine-tune your display brightness. Despite how easy it is, many users aren’t aware of these quick fixes. Windows has many built-in tools to help you. You can change brightness with just a […]
How to Uninstall Problematic Windows Updates Easily [2025]
Learn how to uninstall problematic Windows updates easily. 5 proven methods to fix crashes, boot issues & performance problems. Simple step-by-step guide.

15 Most Essential Windows 11 Privacy And Security Settings [2025]
Learn 15 essential Windows 11 privacy and security settings to protect your data. Master computer privacy settings with simple steps to manage privacy settings effectively.

Rename Your Device For Better Security Windows [Windows 11 & 10]
Learn to rename your device for better security Windows 11 & 10. Simple steps to protect your computer from hackers. Improve privacy and security now.

How To Adjust Display Appearance Settings Easily in Windows 11/10
Learn to adjust display appearance settings easily Windows offers. Simple guide covers brightness, scaling, resolution & multi-monitor setup for better screen experience.

Supercharge Your Productivity: A Solopreneur’s and SMB’s Guide to Mastering Google Workspace with Gemini’
Picture this. It’s Monday morning. You open your laptop. Email notifications flood your screen. Your to-do list has 47 items. Three clients need proposals by Friday. Your spreadsheet crashed yesterday. The presentation for tomorrow’s meeting is half-finished. Sound familiar? Most small business owners live this reality. They jump between apps. They lose files. They spend […]

9 Quick Tips: How To Optimize Computer Performance
Learn how to optimize computer performance with simple steps. Clean hard drives, remove unused programs, and boost speed. No technical skills needed. Start today!