How to Transfer iPhone Photos to Your Mac (8 Easy Solutions)
Have you clicked a stellar image with your iPhone and now want to upload it on your website or edit it?
Then, you can easily transfer your iPhone photos to your Mac to edit them with robust MacOS editing tools and further upload them on the web. Transferring photos from iPhone to Mac can save storage space on your iPhone and allows you to safely backup your special images.
Since iPhone and Mac are both Apple products; thus, there are many ways available to transfer photos from iPhone to Mac. Let’s scroll down to check out 8 easy solutions to transfer photos from iPhone to Mac.
Solution 1. AirDrop Photos
AirDrop is Apple’s data transfer technology that allows users to share data across multiple Apple devices ranging within 30 feet. To AirDrop photos, first, turn on the WiFi network and Bluetooth on both your iPhone and Mac. After that, follow these steps:
Step 1. Open the Photos app on your iPhone and select the photo or photos you want to transfer to Mac.
Step 2. Tap on the Share icon from the bottom and select AirDrop from the popup menu.
Step 3. Choose your Mac’s name.
Step 4. Wait for a few minutes until the iPhone shows a successful transfer message.

Solution 2. Through Photos App
The Photos app is a centralized location in both Mac and iPhone to store photos and videos. Thus, you can easily transfer photos between both Apple devices using this app as:
Step 1. Connect the iPhone to your Mac using a USB cable and launch the Photos app.
Step 2. The Photos app on Mac can Import all the photos and videos from your iPhone Photos app. Select the iPhone name from the Photos sidebar if the Import screen doesn’t automatically appear on Mac.
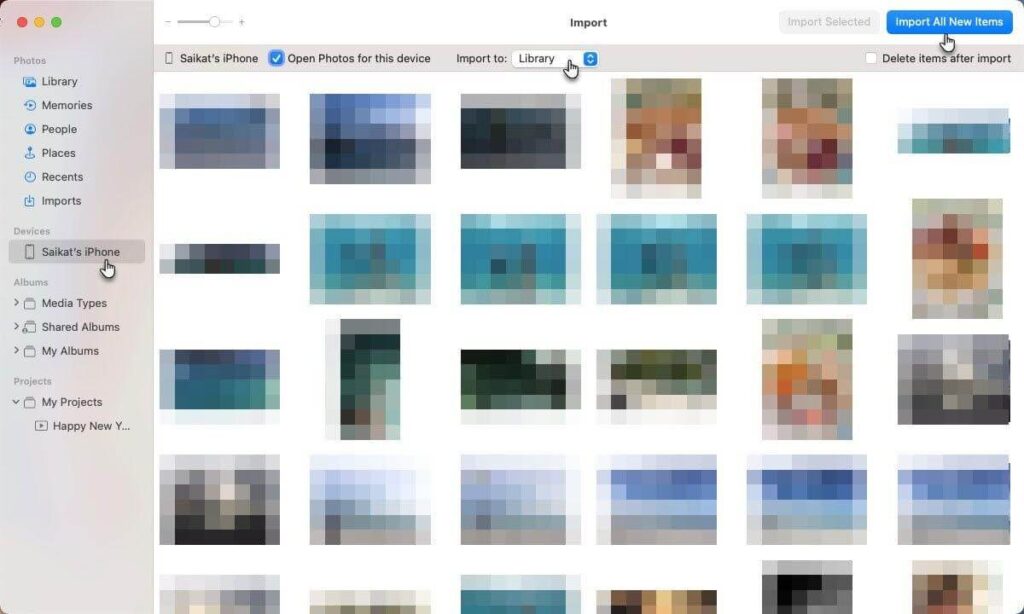
Step 3. Unlock your iPhone and tap on the Trust when a Trust This Computer message displays.
Step 4. Select Import Selected to transfer chosen photos to Mac or simply click on Import All New Photos to transfer the entire camera roll.
Solution 3. The Files App
The Files app is a default Apple program that helps users to manage files on iPhone and share across Dropbox, Google Drive, etc. This tool can also manage photos and send them to Mac. Here’s how you can use this utility app to transfer photos from iPhone to Mac:
Step 1. Launch the Files app on your iPhone.
Step 2. Tap the ellipsis icon on the upper right corner or on the Browse if you are on any other screen.
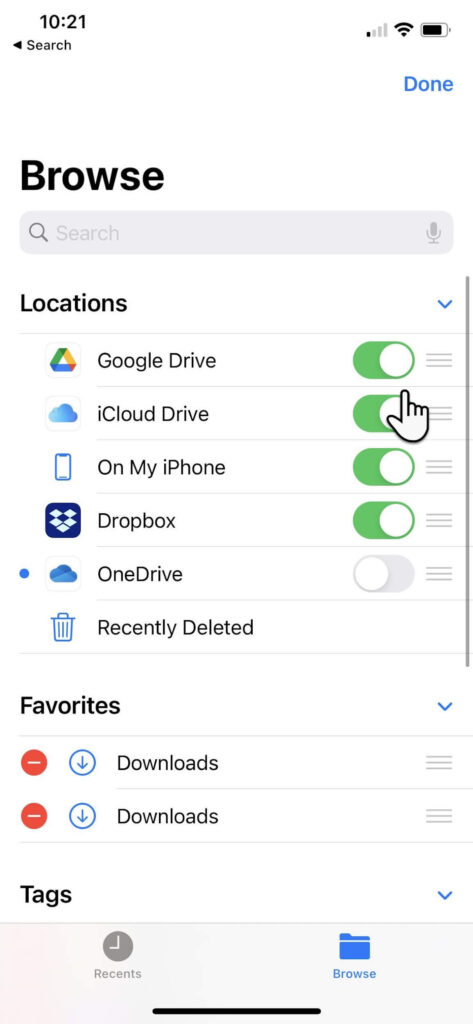
Step 3. Tap Edit and under the Location, turn on the toggle next to iCloud Drive or other third-party cloud services. Tap Done.
Step 4. Go to the Photos app on iPhone, select the photo to transfer, and tap on the Share icon.
Step 5. Select Save to Files and choose iCloud Drive or any other storage services. Tap Done.
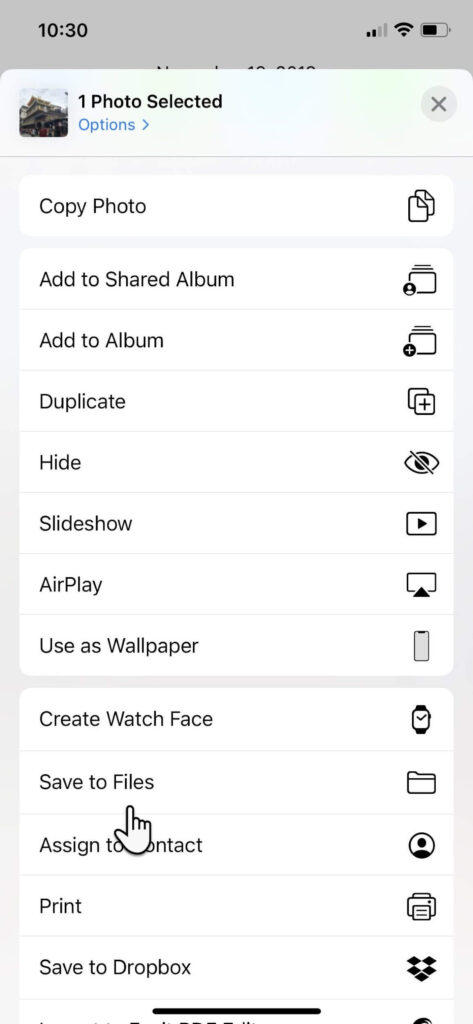
Step 6. Open iCloud Drive on your Mac, and the selected photo will be now available there.
Solution 4. iCloud Photos
Once you sync iCloud with Photos, you can access all Photos app content across all your devices. However, the only problem is that iCloud offers 5 GB of free space, which will exhaust pretty quickly. Thus, you have to buy extra space on iCloud to enjoy the auto photo library sync feature.
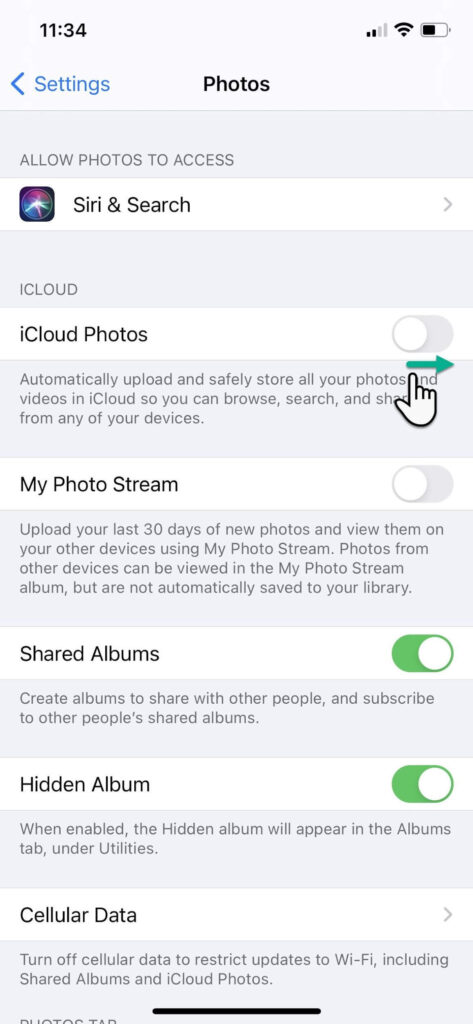
Before that, make sure that iCloud Photos is enabled on your iPhone and Mac:
Go to Settings on your iPhone > Photos > Switch toggle to green next to iCloud Photos.
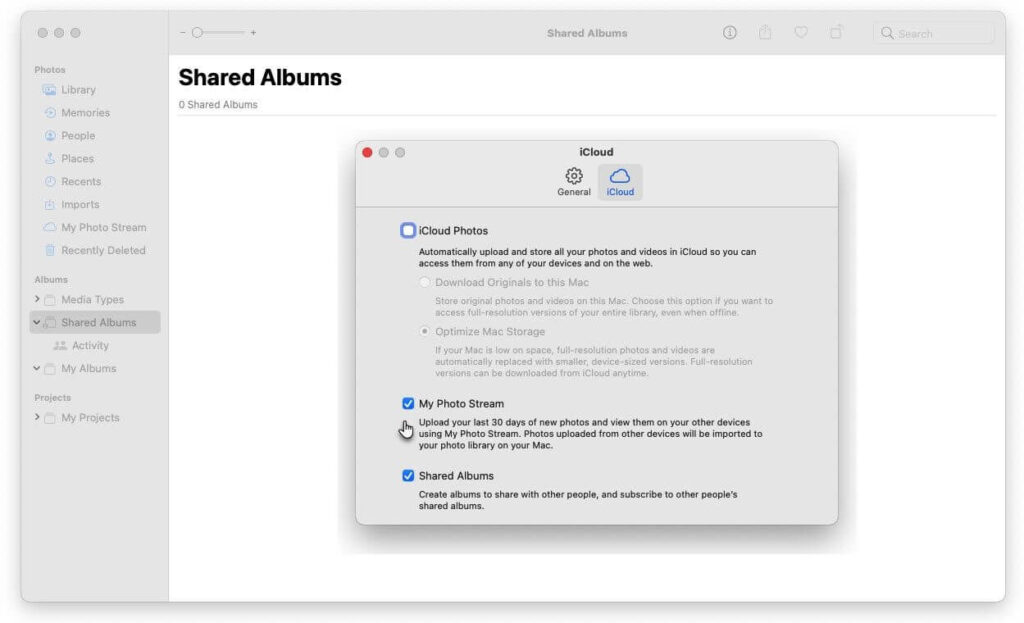
Open the Photos app on Mac > Photos > Preferences > iCloud > Checkbox next to iCloud Photos.
Solution 5. Use iCloud Photos Stream
One second, we have already discussed this solution. No, we have talked about iCloud Photos, not iCloud Photos Stream. But what’s the difference?
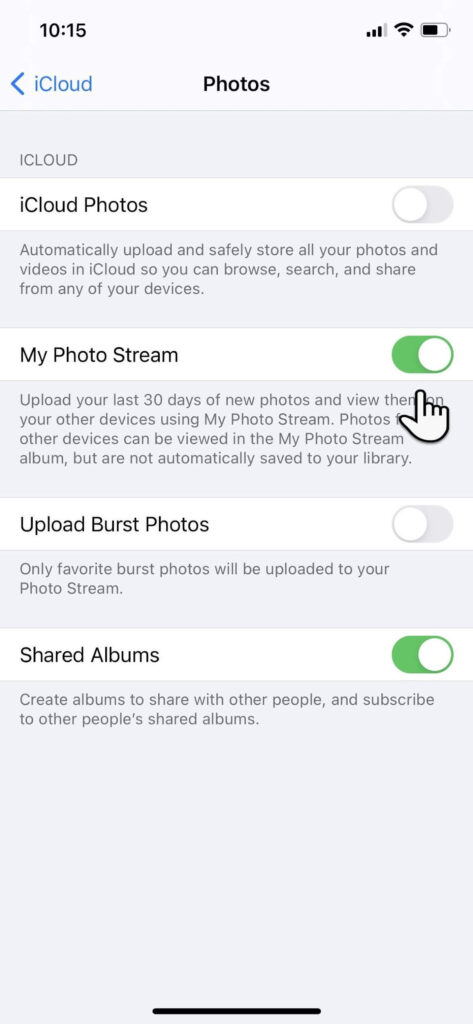
The iCloud Photos allows you to store all photos and videos on the cloud. But iCloud Photos Stream only uploads your new photos (no Live Photos or videos). It will only keep 30 days old photos on the cloud. This is a great feature to save space on iCloud.
To enable this feature on iPhone, go to Settings > iCloud > Photos > My Photo Streams.
On Mac, open the Photos app > Photos > Preferences > iCloud > My Photo Streams.
Solution 6. Image Capture
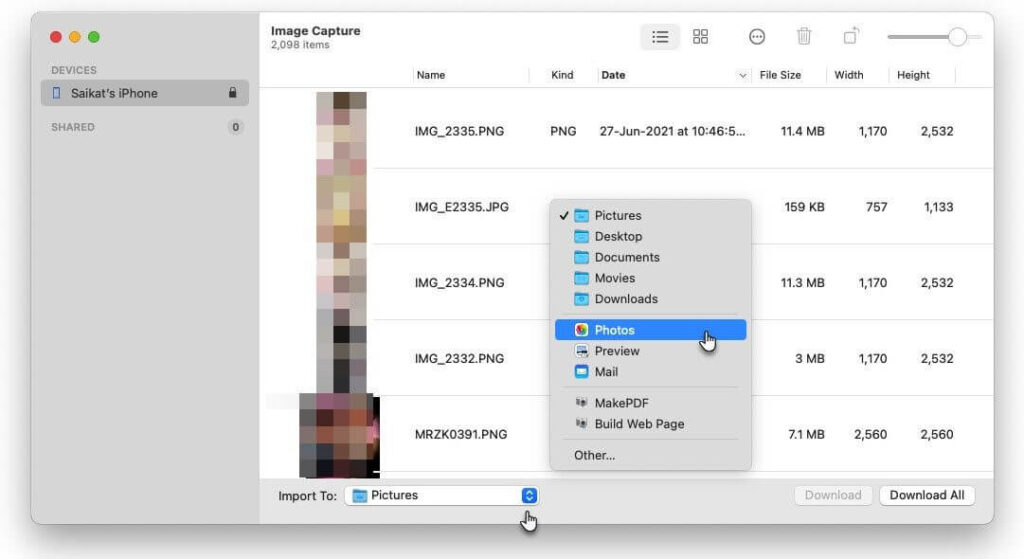
Image Capture is a default Mac utility app to import photos from digital cameras and scanners. But it can transfer photos from other devices too, including iPhone, as follows:
Step 1. Connect the iPhone to your Mac using the USB cable.
Step 2. Launch the Image Capture app on Mac and select your iPhone name from the Devices or Shared list.
Step 3. Select the images you want to transfer to Mac.
Step 4. Choose the Import To from the bottom of the window and select the location to save photos. You can also save photos as web pages or PDF.
Solution 7. Use Finder
If you use macOS Catalina (10.15) or later, you can easily transfer photos from iPhone to Mac via Finder. To do so:
Step 1. Connect the iPhone to your Mac using a USB cable.
Step 2. Open the Finder window on Mac and select your iPhone under the Devices.
Step 3. Click Photos from the top of your screen and check the “Sync Photos” box.
Step 4. Select all photos and albums or just a few photos, click Apply to complete the transfer.
Solution 8. Third-party Program
If you want a better solution than the iCloud and Photos app to transfer photos from iPhone to Mac, you can use a third-party tool called AnyTrans. It is a backup and media downloader that can seamlessly transfer content between iPhone and Mac. To use this app:
Step 1. Download AnyTrans on both your devices and connect them to the same network.
Step 2. Connect the iPhone to your Mac using a cable.
Step 3. Allows AnyTrans to access your photos and navigate to Device Manager > Export iPhone content to your Mac.
That’s it! Now, you are ready to transfer photos from iPhone to Mac. You can use any method at your convenience to migrate photos. If you get stuck somewhere, jot down below to us. We will shortly help you out.
To read more articles on Mac usability, you can go to other articles on this blog site or follow us on social media networks.
Popular Post
Recent Post
How To Get More Storage On PC Without Deleting Anything [2025]
Running out of space on your PC is frustrating. You might think deleting files is the only way. But that’s not true. There are many ways to get more storage without losing your important data. Learning how to get more storage on PC can save you time and stress. These methods work well and keep […]
How To Speed Up An Old Laptop [Windows 11/10]: Complte Guide
Is your old laptop running slowly? You’re not alone. Many people face this issue as their computers age. Learning how to speed up an old laptop is easier than you think. Over time, older laptops tend to slow down for a variety of reasons. Fortunately, with a few smart tweaks, you can significantly boost their […]
How To Reset Your PC For A Fresh Start In Windows 11/10 [2025]
Is your Windows computer lagging or behaving unpredictably? Are you constantly dealing with system errors, crashes, or sluggish performance? When troubleshooting doesn’t help, performing a full reset might be the most effective way to restore stability. Resetting your PC clears out all installed applications, personal files, and custom settings. It restores the system to its […]
How To Adjust Display Brightness Settings Easily in Windows [2025]
If your screen is overly bright or dim, it can strain your eyes and make tasks uncomfortable. Fortunately, Windows offers simple tools to fine-tune your display brightness. Despite how easy it is, many users aren’t aware of these quick fixes. Windows has many built-in tools to help you. You can change brightness with just a […]
How to Uninstall Problematic Windows Updates Easily [2025]
Learn how to uninstall problematic Windows updates easily. 5 proven methods to fix crashes, boot issues & performance problems. Simple step-by-step guide.
15 Most Essential Windows 11 Privacy And Security Settings [2025]
Learn 15 essential Windows 11 privacy and security settings to protect your data. Master computer privacy settings with simple steps to manage privacy settings effectively.
Rename Your Device For Better Security Windows [Windows 11 & 10]
Learn to rename your device for better security Windows 11 & 10. Simple steps to protect your computer from hackers. Improve privacy and security now.
How To Adjust Display Appearance Settings Easily in Windows 11/10
Learn to adjust display appearance settings easily Windows offers. Simple guide covers brightness, scaling, resolution & multi-monitor setup for better screen experience.
Supercharge Your Productivity: A Solopreneur’s and SMB’s Guide to Mastering Google Workspace with Gemini’
Picture this. It’s Monday morning. You open your laptop. Email notifications flood your screen. Your to-do list has 47 items. Three clients need proposals by Friday. Your spreadsheet crashed yesterday. The presentation for tomorrow’s meeting is half-finished. Sound familiar? Most small business owners live this reality. They jump between apps. They lose files. They spend […]
9 Quick Tips: How To Optimize Computer Performance
Learn how to optimize computer performance with simple steps. Clean hard drives, remove unused programs, and boost speed. No technical skills needed. Start today!

