How To Manage & Free Up Disk Space On Windows 11 [2025]
Low disk space on Windows 11 is a frequent issue that can lead to slow performance, program crashes, and failure to save files. Fortunately, understanding how to manage your storage can quickly resolve these problems and keep your system running smoothly.
A lot of people aren’t aware that Windows 11 includes built-in features to help free up disk space. Instead, they assume purchasing a new hard drive is the only solution, which isn’t the case. With the right tools already in the system, you can clear out clutter and reclaim space without spending a rupee.
This guide shows simple ways to manage disk space on Windows 11. We’ll cover basic cleanup methods. We’ll also share advanced tips.
Part 1: Why Free Up Disk Space on Windows 11?
When your hard drive fills up, Windows 11 struggles to work properly. This creates many problems that slow down your daily tasks.
Here’s why:
- Faster boot times – Windows 11 starts quicker with more free space
- Better program performance – Apps run smoother when disk space is available
- Prevents system crashes – Low disk space causes Windows 11 to freeze or crash
- Enables system updates – Windows 11 needs space to download and install updates
- Improves file saving – Documents and files save faster with adequate space
- Reduces system errors – Many Windows 11 errors happen due to low disk space
- Better virtual memory – Windows 11 uses disk space for temporary memory
- Prevents data loss – Full drives can corrupt files and lose important data
Part 2: How to Free Up Disk Space on Windows 11?
Clearing out disk space in Windows 11 is all about using the right built-in tools for the job. The operating system offers a variety of options, each designed to tackle specific kinds of junk, like temporary files, system logs, or old Windows updates. With these tools at your fingertips, managing storage becomes a lot more efficient and hassle-free.
The key to success is using multiple methods together. This approach helps you free up disk space on Windows 11 more effectively. Let’s explore the best ways to manage disk space on Windows 11.
Method 1: Use the Disk Cleanup Tool
Disk Cleanup is Windows 11’s basic space management tool. It finds temporary files on your computer. These files are safe to remove. The tool has helped users for many years.
The tool scans your entire system first. It looks for files you don’t need. Then it shows you how much space each file type uses.
How Disk Cleanup helps:
- Removes temporary Internet files
- Clears system cache files
- Deletes old Windows update files
- Removes recycle bin contents
- Clears thumbnail cache
Steps to use Disk Cleanup:
- Press Windows key + R. Type “cleanmgr” and press Enter. Select your main drive (usually C:). Wait for the scan to complete. Check boxes for files you want to delete.
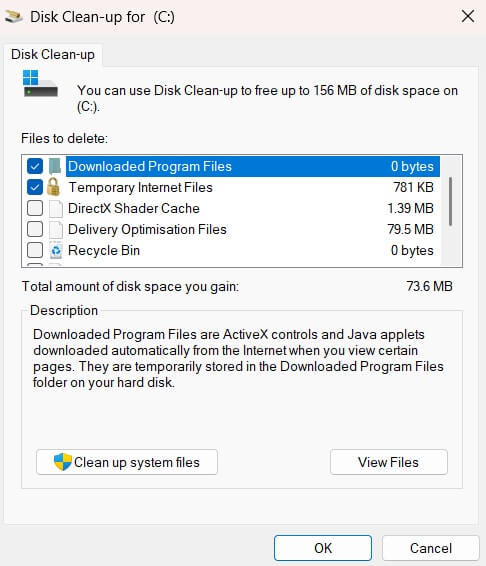
- Click “Clean up system files” for more options. Click “OK” to start the cleanup
Method 2: Use Storage Sense
Storage Sense is an automatic cleanup tool built into Windows 11 that quietly runs in the background as you use your PC. There’s no need to launch it manually—it takes care of freeing up disk space on its own, making storage management effortless.
Storage Sense takes care of file cleanup automatically. It prioritizes temporary files, then clears out old downloads you might’ve overlooked. You can customize how often it runs—daily, weekly, or monthly—to keep your system tidy without lifting a finger.
How Storage Sense helps:
- Automatically deletes temporary files
- Removes old files from the Downloads folder
- Clears the recycle bin contents
- Manages OneDrive files
- Frees up space while you work
Steps to enable Storage Sense:
- Open Settings (Windows key + I). Go to System > Storage. Click “Storage Sense”. Turn on “Storage Sense”. Click “Configure Storage Sense.”
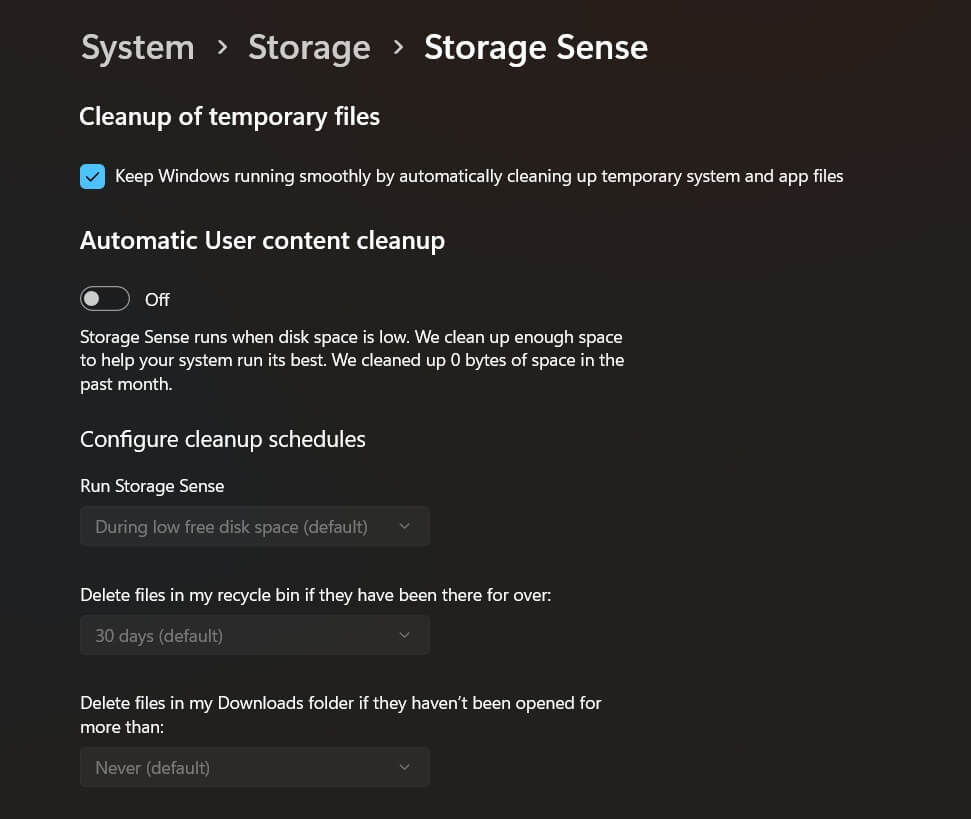
- Set how often it runs. Choose what files to delete automatically
Method 3: Uninstall Unused Programs
Unnecessary programs can take up a surprising amount of disk space. Windows 11 often comes with pre-installed apps, and over time, more software gets added and then neglected. In reality, most users don’t need or use every program on their system.
Some programs use huge amounts of space. Games often take 50GB or more. Media software can use 10-20GB each. Check your program list every month. Remove programs you haven’t used in 6 months.
How uninstalling programs helps:
- Frees up large amounts of space quickly
- Removes associated temporary files
- Reduces startup time
- Improves system performance
- Eliminates security risks from old software
Steps to uninstall programs:
- Open Settings (Windows key + I). Go to Apps > Installed apps. Look through your program list. Click the three dots next to unused programs. Select “Uninstall.”
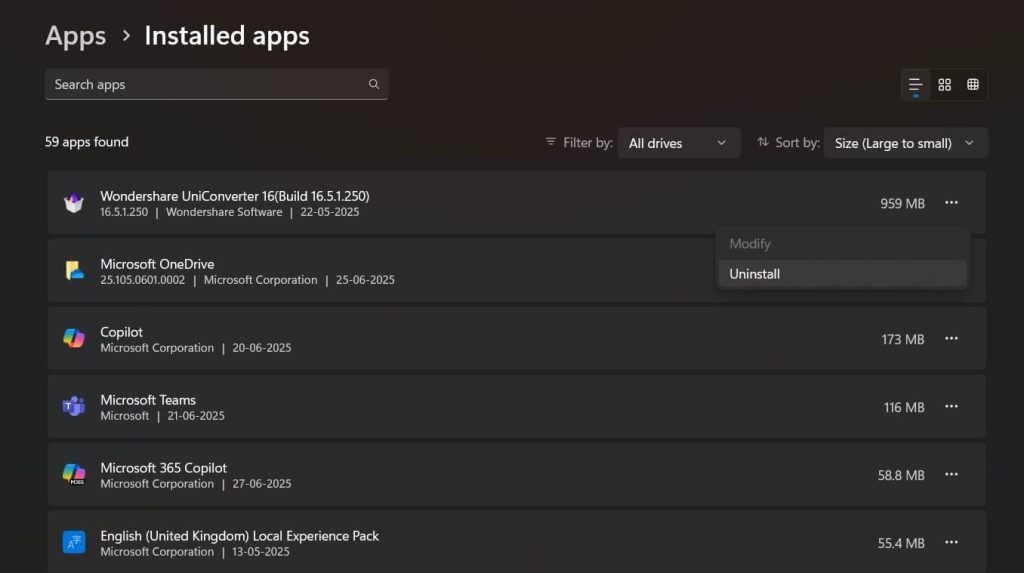
- Follow the removal prompts. Restart if prompted
Method 4: Clear Browser Cache and Data
Web browsers store lots of temporary data on your computer. This includes images from websites you visited. It also includes scripts and cookies. All browsers do this automatically.
As you browse the web, browsers like Chrome, Edge, and Firefox accumulate cached data—which can quietly expand into several gigabytes over time. Since most users rarely think to clear it, this digital clutter continues to pile up month after month, eating away at valuable storage space.
How clearing browser data helps:
- Removes temporary Internet files
- Deletes stored images and scripts
- Clears download history
- Removes old cookies
- Frees up space from multiple browsers
Steps to clear browser cache:
- Open your web browser. Press Ctrl + Shift + Delete. Select “All time” for time range. Check “Cached images and files”. Check “Cookies and other site data”.
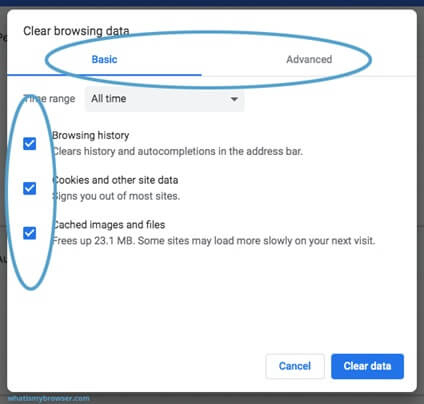
- Click “Clear data“. Repeat for other browsers
Method 5: Delete Large Files and Folders
Large files often hide in places you forget about. Old videos take up the most space. Software installers stay in Downloads forever. Backup files from years ago still sit on your drive.
To track down large files eating up space, open File Explorer and sort your files by size. This brings the biggest offenders right to the top. Focus on files over 100MB that you no longer need—like outdated software installers, old videos, or duplicate photos—and clear them out to reclaim valuable storage.
How deleting large files helps:
- Quickly frees up significant space
- Removes forgotten downloads
- Clears old backup files
- Eliminates duplicate media files
- Makes room for important data
Steps to find and delete large files:
- Open File Explorer. Go to This PC > Local Disk (C:). Click View > Details.
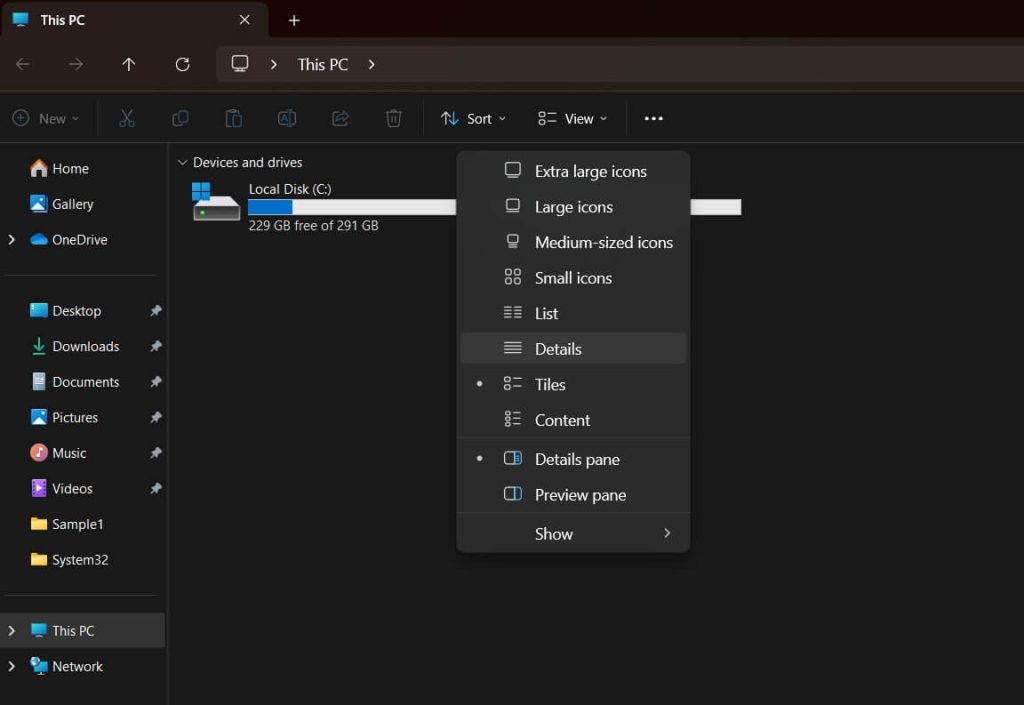
- Click the “Size” column to sort by size. Look for files larger than 100MB. Right-click on unwanted large files. Select “Delete” or move to external storage
Method 6: Use Disk Cleanup Advanced Options
Advanced Disk Cleanup targets system files that regular cleanup can’t touch. These include old Windows installations after updates. They also include system restore points from months ago. This method can free up huge amounts of space.
System files are protected from normal deletion. Advanced options let you access them safely. Windows 11 updates often leave behind old system files. These can use 10-20GB of space. The advanced cleanup removes them properly.
How advanced cleanup helps:
- Removes old Windows installation files
- Clears system restore points
- Deletes Windows update backup files
- Removes driver backup files
- Frees up several gigabytes of space
Steps for advanced cleanup:
- Press Windows key + R. Type “cleanmgr” and press Enter. Select your main drive. Click “Clean up system files”. Wait for the advanced scan.
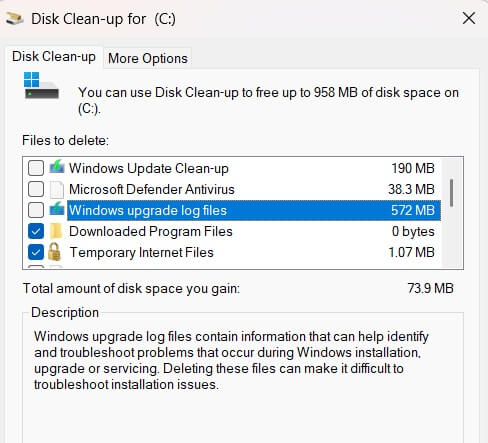
Image name: how-to-manage-disk-space-on-windows-11-07.jpg
Image alt:
- Check “Windows Upgrade Log files”. Click “OK” to start the cleanup.
Method 7: Move Files to External Storage
External storage is perfect for files you rarely need. Old photos from years ago don’t need to stay on your main drive. Large video files can live on external drives. This frees up space without deleting anything important.
You have many external storage options today. USB drives, external hard drives, and cloud storage all work well. You keep your files completely safe. You can still access them when needed. Your main drive gets more room for daily programs.
How external storage helps:
- Keeps files safe while freeing space
- No risk of losing important data
- Easy to access files when needed
- Works for any file type or size
- Creates more room for daily use
Steps to move files to external storage:
- Connect an external drive or set up cloud storage. Open File Explorer. Navigate to folders with large files. Select files you rarely use.
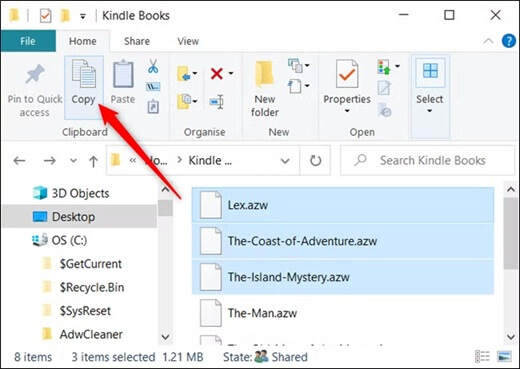
- Right-click and choose “Cut”. Navigate to external storage. Right-click and choose “Paste.”
Part 3: Pro Tips to Free Up Disk Space on Windows 11
Advanced users can apply extra techniques to manage disk space on Windows 11. These pro tips go beyond basic cleanup methods. They help you squeeze out every bit of available space.
Here are expert tips to free up disk space on Windows 11:
- Enable NTFS compression – Compresses files automatically to save 20-30% space
- Use symbolic links – Link folders to external drives without moving them completely
- Clean Windows logs regularly – System logs can grow to several gigabytes over time
- Disable hibernation – Removes hiberfil.sys which can be 4-8GB in size
- Reduce virtual memory – Lower page file size if you have plenty of RAM
- Clear Windows Defender scan history – Old scan logs take up unnecessary space
- Remove language packs – Delete unused language files that came with Windows 11
- Clean registry regularly – Use built-in tools to remove invalid registry entries
Author’s Tip
After helping thousands of users manage disk space on Windows 11, I’ve learned some key lessons. The biggest mistake people make is waiting too long. Don’t wait until your disk is 90% full. Start cleanup when you hit 70% capacity.
Set up Storage Sense to run automatically. This prevents space problems before they start. Also, check your Downloads folder monthly. This folder fills up fast with forgotten files. Many users find 10-20GB of space just by cleaning Downloads.
Create a monthly cleanup routine. Spend 15 minutes checking disk space. Run Disk Cleanup and review installed programs. This small effort prevents big problems later. Your Windows 11 system will thank you with better performance and fewer crashes.
Conclusion
Learning how to manage disk space on Windows 11 is essential for every user. These methods help keep your system running smooth. Regular maintenance prevents most space-related problems.
Start with the simple methods like Disk Cleanup and Storage Sense. These tools handle most cleanup tasks automatically. Then move to advanced techniques like uninstalling programs and moving large files. The combination of these methods keeps your Windows 11 system healthy.
Remember that managing disk space on Windows 11 is an ongoing task. Set up automatic tools where possible. Check your space monthly. With these habits, you’ll never run into serious disk space problems again. Your computer will run faster and more reliably for years to come.
FAQs
Q: How much free disk space does Windows 11 need to run properly?
Windows 11 needs at least 15-20% of your total disk space to remain free. For a 500GB drive, keep 75-100GB free. This space allows Windows 11 to create temporary files, download updates, and manage virtual memory. Less than 15% free space causes performance problems and system errors.
Q: Will deleting system files harm my Windows 11 computer?
Using built-in Windows 11 cleanup tools is safe for system files. Tools like Disk Cleanup and Storage Sense only remove files that Windows 11 can recreate. Never manually delete files from Windows, System32, or Program Files folders. Always use official Microsoft tools to manage disk space on Windows 11.
Q: How often should I clean up disk space on Windows 11?
Clean up disk space on Windows 11 at least once per month. Enable Storage Sense to run automatically weekly. Check your Downloads folder and installed programs monthly. Run full Disk Cleanup quarterly. Heavy users should clean more often. Regular maintenance prevents serious space problems and keeps Windows 11 running smoothly.
Popular Post
Recent Post
How To Get More Storage On PC Without Deleting Anything [2025]
Running out of space on your PC is frustrating. You might think deleting files is the only way. But that’s not true. There are many ways to get more storage without losing your important data. Learning how to get more storage on PC can save you time and stress. These methods work well and keep […]
How To Speed Up An Old Laptop [Windows 11/10]: Complte Guide
Is your old laptop running slowly? You’re not alone. Many people face this issue as their computers age. Learning how to speed up an old laptop is easier than you think. Over time, older laptops tend to slow down for a variety of reasons. Fortunately, with a few smart tweaks, you can significantly boost their […]
How To Reset Your PC For A Fresh Start In Windows 11/10 [2025]
Is your Windows computer lagging or behaving unpredictably? Are you constantly dealing with system errors, crashes, or sluggish performance? When troubleshooting doesn’t help, performing a full reset might be the most effective way to restore stability. Resetting your PC clears out all installed applications, personal files, and custom settings. It restores the system to its […]
How To Adjust Display Brightness Settings Easily in Windows [2025]
If your screen is overly bright or dim, it can strain your eyes and make tasks uncomfortable. Fortunately, Windows offers simple tools to fine-tune your display brightness. Despite how easy it is, many users aren’t aware of these quick fixes. Windows has many built-in tools to help you. You can change brightness with just a […]
How to Uninstall Problematic Windows Updates Easily [2025]
Learn how to uninstall problematic Windows updates easily. 5 proven methods to fix crashes, boot issues & performance problems. Simple step-by-step guide.
15 Most Essential Windows 11 Privacy And Security Settings [2025]
Learn 15 essential Windows 11 privacy and security settings to protect your data. Master computer privacy settings with simple steps to manage privacy settings effectively.
Rename Your Device For Better Security Windows [Windows 11 & 10]
Learn to rename your device for better security Windows 11 & 10. Simple steps to protect your computer from hackers. Improve privacy and security now.
How To Adjust Display Appearance Settings Easily in Windows 11/10
Learn to adjust display appearance settings easily Windows offers. Simple guide covers brightness, scaling, resolution & multi-monitor setup for better screen experience.
Supercharge Your Productivity: A Solopreneur’s and SMB’s Guide to Mastering Google Workspace with Gemini’
Picture this. It’s Monday morning. You open your laptop. Email notifications flood your screen. Your to-do list has 47 items. Three clients need proposals by Friday. Your spreadsheet crashed yesterday. The presentation for tomorrow’s meeting is half-finished. Sound familiar? Most small business owners live this reality. They jump between apps. They lose files. They spend […]
9 Quick Tips: How To Optimize Computer Performance
Learn how to optimize computer performance with simple steps. Clean hard drives, remove unused programs, and boost speed. No technical skills needed. Start today!

